
yycode User Guide
Table of Contents
- I. Why yycode Exists
- II. What These Tools Actually Are
- III. What Is a Terminal
- IV. Where These Tools Run
- V. What Is an API
- VI. Why Many People Know These Tools but Still Cannot Use Them Well
- VII. What Is yycode
- VIII. What to Do When You See Errors: Troubleshoot Step by Step with Doubao
- IX. Start Using: Registration and Purchase
- X. Install and Configure Tools
- XI. Beginner Usage Manual
I. Why yycode Exists
Over the past two years, more and more people have started using mainstream overseas AI programming tools, such as:
- OpenAI's
Codex - Anthropic's
Claude Code
Their capabilities are not limited to chat. They can directly enter your workflow and help with code, documents, information organization, repetitive tasks, and more.
But for users in China, the real question is not "are these tools powerful?", but:
Many people know about them, but not many can use them smoothly and reliably.
Common difficulties include:
- Needing a proxy/VPN
- Official subscriptions are not cheap
- Risk controls and account bans
- Refund and appeal processes are troublesome
- API pay-as-you-go billing can easily run out of control
So many people are not unwilling to use them. Instead:
They want to use them, but they do not want to pay too much learning cost, time cost, and risk cost just to use them.
yycode appeared to solve this problem.
II. What These Tools Actually Are
2.1 What are OpenAI and Anthropic?
The two most representative companies in AI programming tools today are:
OpenAIAnthropic
The tools mentioned in this document come from these two companies.
2.2 What are ChatGPT and Claude?
These are the product forms most people are familiar with: the chat box on a webpage where you can talk directly.
ChatGPTis OpenAI's chat product for general usersClaudeis Anthropic's chat product for general users
2.3 What are Codex and Claude Code?
The web versions of ChatGPT and Claude focus mainly on conversation, while Codex and Claude Code are:
AI assistants that can help you work inside your computer terminal.
They do more than answer questions. They can participate more deeply in your work, such as:
- Reading code and modifying files
- Helping analyze errors
- Summarizing documents and organizing materials
- Assisting with repetitive computer operations
So their core difference from web AI is:
They can directly operate local files and the terminal environment. They are "work assistants", not just "Q&A assistants".
III. What Is a Terminal
A terminal can be understood as: a window on your computer specifically used to type commands.
It usually looks like a black or dark window, so many people call it the "black box". In the terminal, you mainly type text commands to make the computer perform actions, rather than clicking icons and buttons.
Why explain the terminal? Because:
Claude Code and Codex are tools that run in the terminal.
How to Open a Terminal
Windows
- Method 1: Press
Win-> typeTerminal-> clickWindows Terminal - Method 2: Press
Win-> typePowerShell-> clickWindows PowerShell - Method 3: Press
Win + R-> typecmd-> press Enter
Mac
- Method 1: Press
Command + Space-> typeTerminal-> press Enter - Method 2: Open
Finder->Applications->Utilities-> clickTerminal
IV. Where These Tools Run
Local computer + cloud AI brain.
Your computer: opens the terminal, accepts commands, and displays resultsCloud model: performs the real understanding, analysis, and content generation
Simply put: you enter instructions locally, the AI processes them in the cloud and returns results to your terminal. Therefore, an internet connection is required.
V. What Is an API
Here, an API can be understood as: a channel that lets your computer program call the AI brain.
- When you chat with Claude on the webpage, it is a human talking directly to AI
- An API is software talking to AI on your behalf
Terminal tools such as Claude Code and Codex also use APIs in essence: they send your requests to the model and return the results to you.
VI. Why Many People Know These Tools but Still Cannot Use Them Well
6.1 Official subscriptions have a cost
As of April 2026, official subscription fees range from $20/month for the basic plan to $200/month for the professional plan. Even after paying, usage may still not be stable and smooth.
6.2 Domestic use has risk-control and account-ban risks
Many proxy services use data-center IPs. When service providers identify them as high-risk sources, users may encounter abnormal login, feature restrictions, account bans, and other issues.
6.3 API solutions are flexible, but costs can easily get out of control
100 USD is roughly 700 RMB at a 1:7 exchange rate. If used frequently, quota can be consumed very quickly. For many new users, it is easy to incur high costs before they have even mastered usage.
VII. What Is yycode
yycode is positioned as:
A solution that helps users use these model capabilities with a lower barrier and in a more stable way.
It aims to solve:
- How to lower the barrier to entry
- How to reduce account and network friction
- How to help beginners start using terminal tools
- How to make costs more controllable
- How to make it easier for Windows and Mac users to get started
yycode is suitable for people who:
- Want to experience advanced AI tools but do not want to handle overseas accounts themselves
- Want to use terminal AI tools on Windows or Mac
- Want help with coding, document organization, knowledge management, and information processing
- Are interested in
Claude CodeandCodex, but still have a relatively weak foundation - Want to first get the usage flow working, then gradually learn more deeply
One-sentence summary: yycode is a solution that helps ordinary users use mainstream AI terminal tools with a low barrier.
VIII. What to Do When You See Errors: Troubleshoot Step by Step with Doubao
During installation and usage, seeing errors you do not understand is normal. Do not panic. You can use Doubao to help troubleshoot.
8.1 What Doubao can help you do
- Recognize images: You can send a terminal screenshot directly to Doubao, and it can understand the error information in it
- Guide you step by step: As long as you provide the right prompt, Doubao can guide you like a remote assistant and tell you what to do step by step
8.2 How to take screenshots
Mac: Press Command + Shift + 4. The cursor turns into a crosshair. Select the terminal error area, release, and the screenshot is automatically saved to the desktop.
Windows: Press Win + Shift + S. The cursor turns into a crosshair. Select the terminal error area, and the screenshot is automatically copied to the clipboard so you can paste it directly.
8.3 How to ask Doubao
Core principle: solve one problem at a time, step by step, and do not deviate from the goal.
Each time you encounter an error, open a new conversation in Doubao and first send the following prompt (replace the content in brackets with your actual goal):
I am a command-line beginner and do not understand what many messages in the terminal mean. My core goal is only one thing: [your goal, such as "install Node.js and confirm it works normally" or "install Claude Code and confirm it works normally"]. Next, I will send you the full terminal message exactly as it appears, or send you a screenshot directly. Please guide me step by step based on what I send.
Requirements: do not explain concepts, do not digress, only guide me to complete the goal.
- Always stay focused on the core goal and do not go off-topic.
- Do not give me many steps at once. Tell me only what to do in the current step.
- Explain each step in words a beginner can understand. Do not assume I understand the command line.
- Clearly tell me: what to type now, what key to press, and what counts as normal output.
- If the terminal shows an error, warning, choice, or permission prompt, judge it based on the original text I send you. Do not ask me to guess.
- If a step succeeds, clearly tell me "this step is complete, next do this".
- Treat yourself as someone remotely accompanying me through the installation: I paste terminal output or screenshots, and you decide the next step until the goal is complete.
8.4 What to do after sending it to Doubao
- After sending the prompt, send the error screenshot or text. Doubao will tell you the first step.
- After doing what Doubao says, send the result screenshot back. Doubao will judge whether it succeeded and tell you the next step.
- Repeat this process until the issue is resolved.
8.5 Notes
- One conversation solves one problem only. Do not mix multiple different problems in the same conversation.
- Do not skip steps. If Doubao says do A first, do A first. Do not jump to B by yourself.
- If you do not understand, take a screenshot. Doubao can recognize images. Screenshots are more accurate than manual copy/paste and less likely to miss information.
- Do not cherry-pick steps you understand from Doubao's reply. Follow the order strictly.
For any error in all later steps, use Doubao with this method to troubleshoot.
8.6 Proxy Environment Issues: the Most Common Hidden Pitfall
Many users have proxy/VPN tools installed on their computers, such as Clash, V2Ray, Shadowsocks, airport clients, and similar tools. These tools can sometimes silently affect the terminal's network environment, causing all kinds of confusing errors during installation or use.
Even more troublesome: many people do not know whether their computer has a proxy installed, whether it is enabled, or how it is configured.
Common symptoms
npm installkeeps hanging, or reports timeoutECONNREFUSEDappearsETIMEDOUTappearsUNABLE_TO_VERIFY_LEAF_SIGNATUREor other SSL / certificate errors appearCERT_HAS_EXPIREDorSELF_SIGNED_CERT_IN_CHAINappears- The browser can access the internet, but terminal commands cannot connect
Why this happens
Proxy tools usually modify system network proxy settings, but terminal programs such as npm do not necessarily use this proxy automatically. The result is: the browser works normally, while the terminal is disrupted by proxy settings.
The simplest quick attempt
If you know your computer has proxy software, first try:
- Completely exit the proxy software (not minimize; right-click Exit / fully close it)
- Close the current terminal window and open a new terminal (this is important; environment variables in the old window will not refresh automatically)
- Run the previous command again
Many times, closing the proxy and reopening the terminal solves the problem.
If you are not sure whether you have a proxy: ask Doubao to help check
Open Doubao, start a new conversation, and send this:
I am a command-line beginner. My computer may have proxy/VPN software installed, but I am not sure whether it is installed, enabled, or configured. I am currently seeing network-related errors when running commands in the terminal (or I want to check whether the environment is clean before installation). Please guide me step by step to check:
- Whether any proxy software is currently running on my system.
- Whether proxy environment variables are set in my terminal (HTTP_PROXY, HTTPS_PROXY, ALL_PROXY, etc.).
- Whether npm global configuration has proxy settings.
- Based on the results, tell me what to do (turn off the proxy / clear residual configuration / correctly configure the terminal to use the proxy).
Requirements: only give me one step at a time. I will send the result after I finish, then you tell me the next step. My system is [Mac / Windows].
Then follow Doubao's guidance step by step.
8.7 Common Troubleshooting After Installation
After installing tools such as Node.js, Codex, and Claude Code, you may still encounter various errors the first time you use them. Do not panic. Most issues have fixed troubleshooting routines. Below are corresponding Doubao prompt templates by common type. Copy them, replace the bracketed content, and send them to Doubao.
1. Command not found
You just installed it, but the terminal says the command cannot be found. Open a new Doubao conversation and send:
I typed [node / npm / codex / claude] in the terminal, and it says "command not found" (or "not recognized as an internal or external command"). I already installed it with npm. Please help me troubleshoot why this command cannot be found, one step at a time. I will send the result after each step. My system is [Mac / Windows].
2. Permission issue (Permission denied / EACCES)
When I run [your command] in the terminal, it reports a permission error (Permission denied or EACCES). Please guide me step by step to solve it, and do not ask me to perform dangerous operations that may damage the system. My system is [Mac / Windows].
3. Network issue (timeout / ECONNREFUSED / fetch failed)
This type of issue is very likely related to proxies. First follow the method in Section 8.6 to check the proxy environment. If you confirm it is not a proxy issue, send the error screenshot to Doubao.
4. Wrong version or version conflict
I installed [tool name], but it says the version is incompatible / requires a higher Node.js version when running. My current Node.js version is [paste the output of node -v]. Please help me determine whether I need to upgrade and how to upgrade. One step at a time. My system is [Mac / Windows].
5. Other completely incomprehensible errors
Send a screenshot directly to Doubao with this:
I encountered the following error while [installing / using] [tool name], and I do not understand it at all. Please help me determine what the problem is, then guide me step by step to solve it. One step at a time. I will send the result after each step. My system is [Mac / Windows].
Summary
| Symptom keyword | What to check first |
|---|---|
| timeout / ECONNREFUSED / SSL / certificate | -> Check proxy first (Section 8.6) |
| command not found / not recognized as an internal command | -> Environment variables / PATH issue (1) |
| Permission denied / EACCES | -> Permission issue (2) |
| Incompatible version / engine not satisfied | -> Node.js version (4) |
| Other English you cannot understand | -> Send screenshot to Doubao (5) |
IX. Start Using: Registration and Purchase
Registration and purchase do not require a proxy tool. It is recommended to open the Doubao web version or any AI model you have at hand, preferably one that can recognize images.
Official website: https://yycode/
Step 1: Register an account
Go to https://yycode.net/register to register an account. Please remember your email address; we use it to locate your account when there are issues.
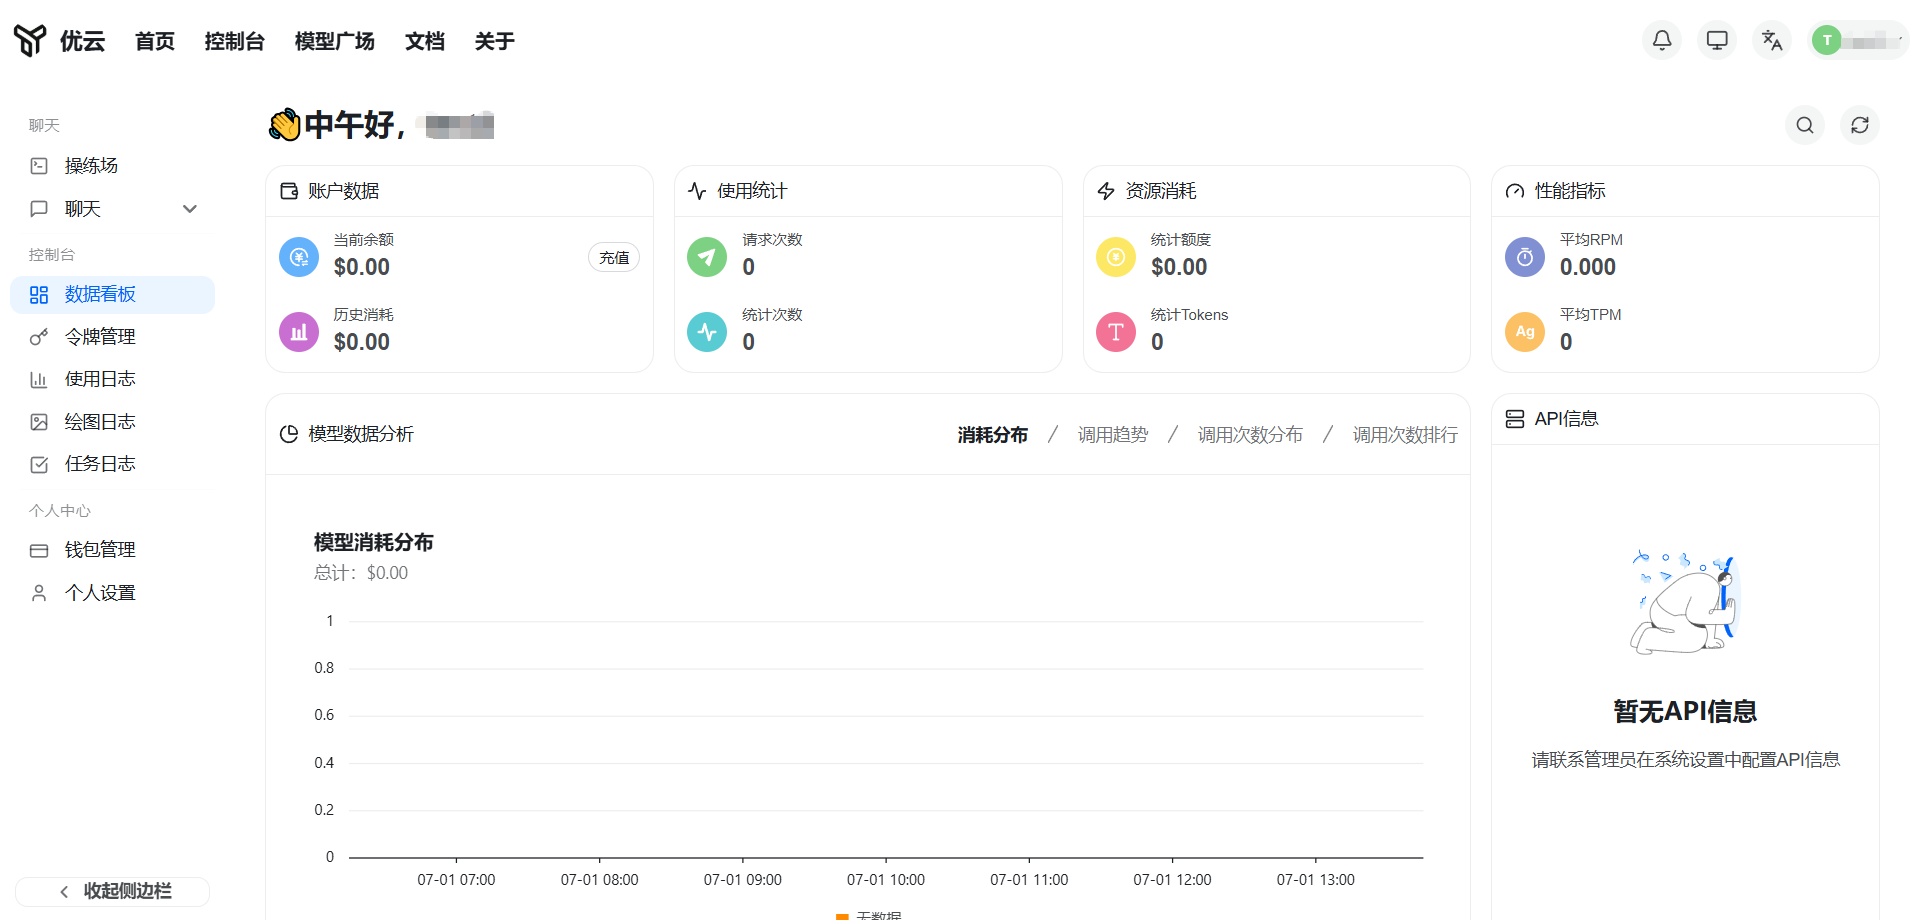
After registration and login, enter the dashboard:
Step 2: Top up
After registration and login -> left sidebar Wallet Management -> https://yycode.net/console/topup
Model pricing notes
Detailed prices: https://yycode.net/pricing
Our prices are denominated in RMB (¥). Official original prices are marked in USD ($), with an approximate exchange rate of 1:7 (the actual exchange rate depends on payment time), unit: million tokens.
How to understand the multiplier? How much USD model usage can 1 RMB buy?
yycode pricing formula: official USD price x multiplier = RMB price (the multiplier already includes exchange-rate conversion). The lower the multiplier, the better the value:
Step 3: Refresh the page
After refreshing the page, the amount in the top-right corner will increase. Be sure to add customer support on WeChat here so you can join the after-sales group.
Step 4: Create an API Key
Left sidebar Token Management -> Add Token
- The name can be anything, such as
yycode - Select a group -> choose according to the tool you want to use:
- Use Codex (OpenAI tool) -> choose the
codexgroup - Use Claude Code (Anthropic tool) -> choose the corresponding Claude group
- Use Codex (OpenAI tool) -> choose the
- Other fields can be left empty
- Click submit

Note: If you want to use both Codex and Claude Code, you need to create two separate keys, each selecting the corresponding group.
X. Install and Configure Tools
Before installation, check your proxy environment first: If your computer has proxy/VPN software installed (Clash, V2Ray, airport clients, etc.), please completely exit the proxy software before starting the steps below. Proxies are the most common "hidden pitfall" during installation: the browser being able to access the internet does not mean the terminal can connect normally. See Section 8.6. If you are not sure whether you have a proxy, we also recommend following Section 8.6 and asking Doubao to check first.
Step 5: Download CC Switch
CC Switch is an open-source tool for managing and switching API providers (author: farion1231).
User manual (if you encounter issues, send this link to Doubao for troubleshooting assistance):
https://github.com/farion1231/cc-switch/blob/main/docs/user-manual/zh/README.md
System requirements:
- Windows: Windows 10 or above
- macOS: macOS 12 (Monterey) or above
- Linux: Ubuntu 22.04+ / Debian 11+ / Fedora 34+ and other mainstream distributions
Download steps:
- Open https://github.com/farion1231/cc-switch/tree/main, scroll down to find the README:
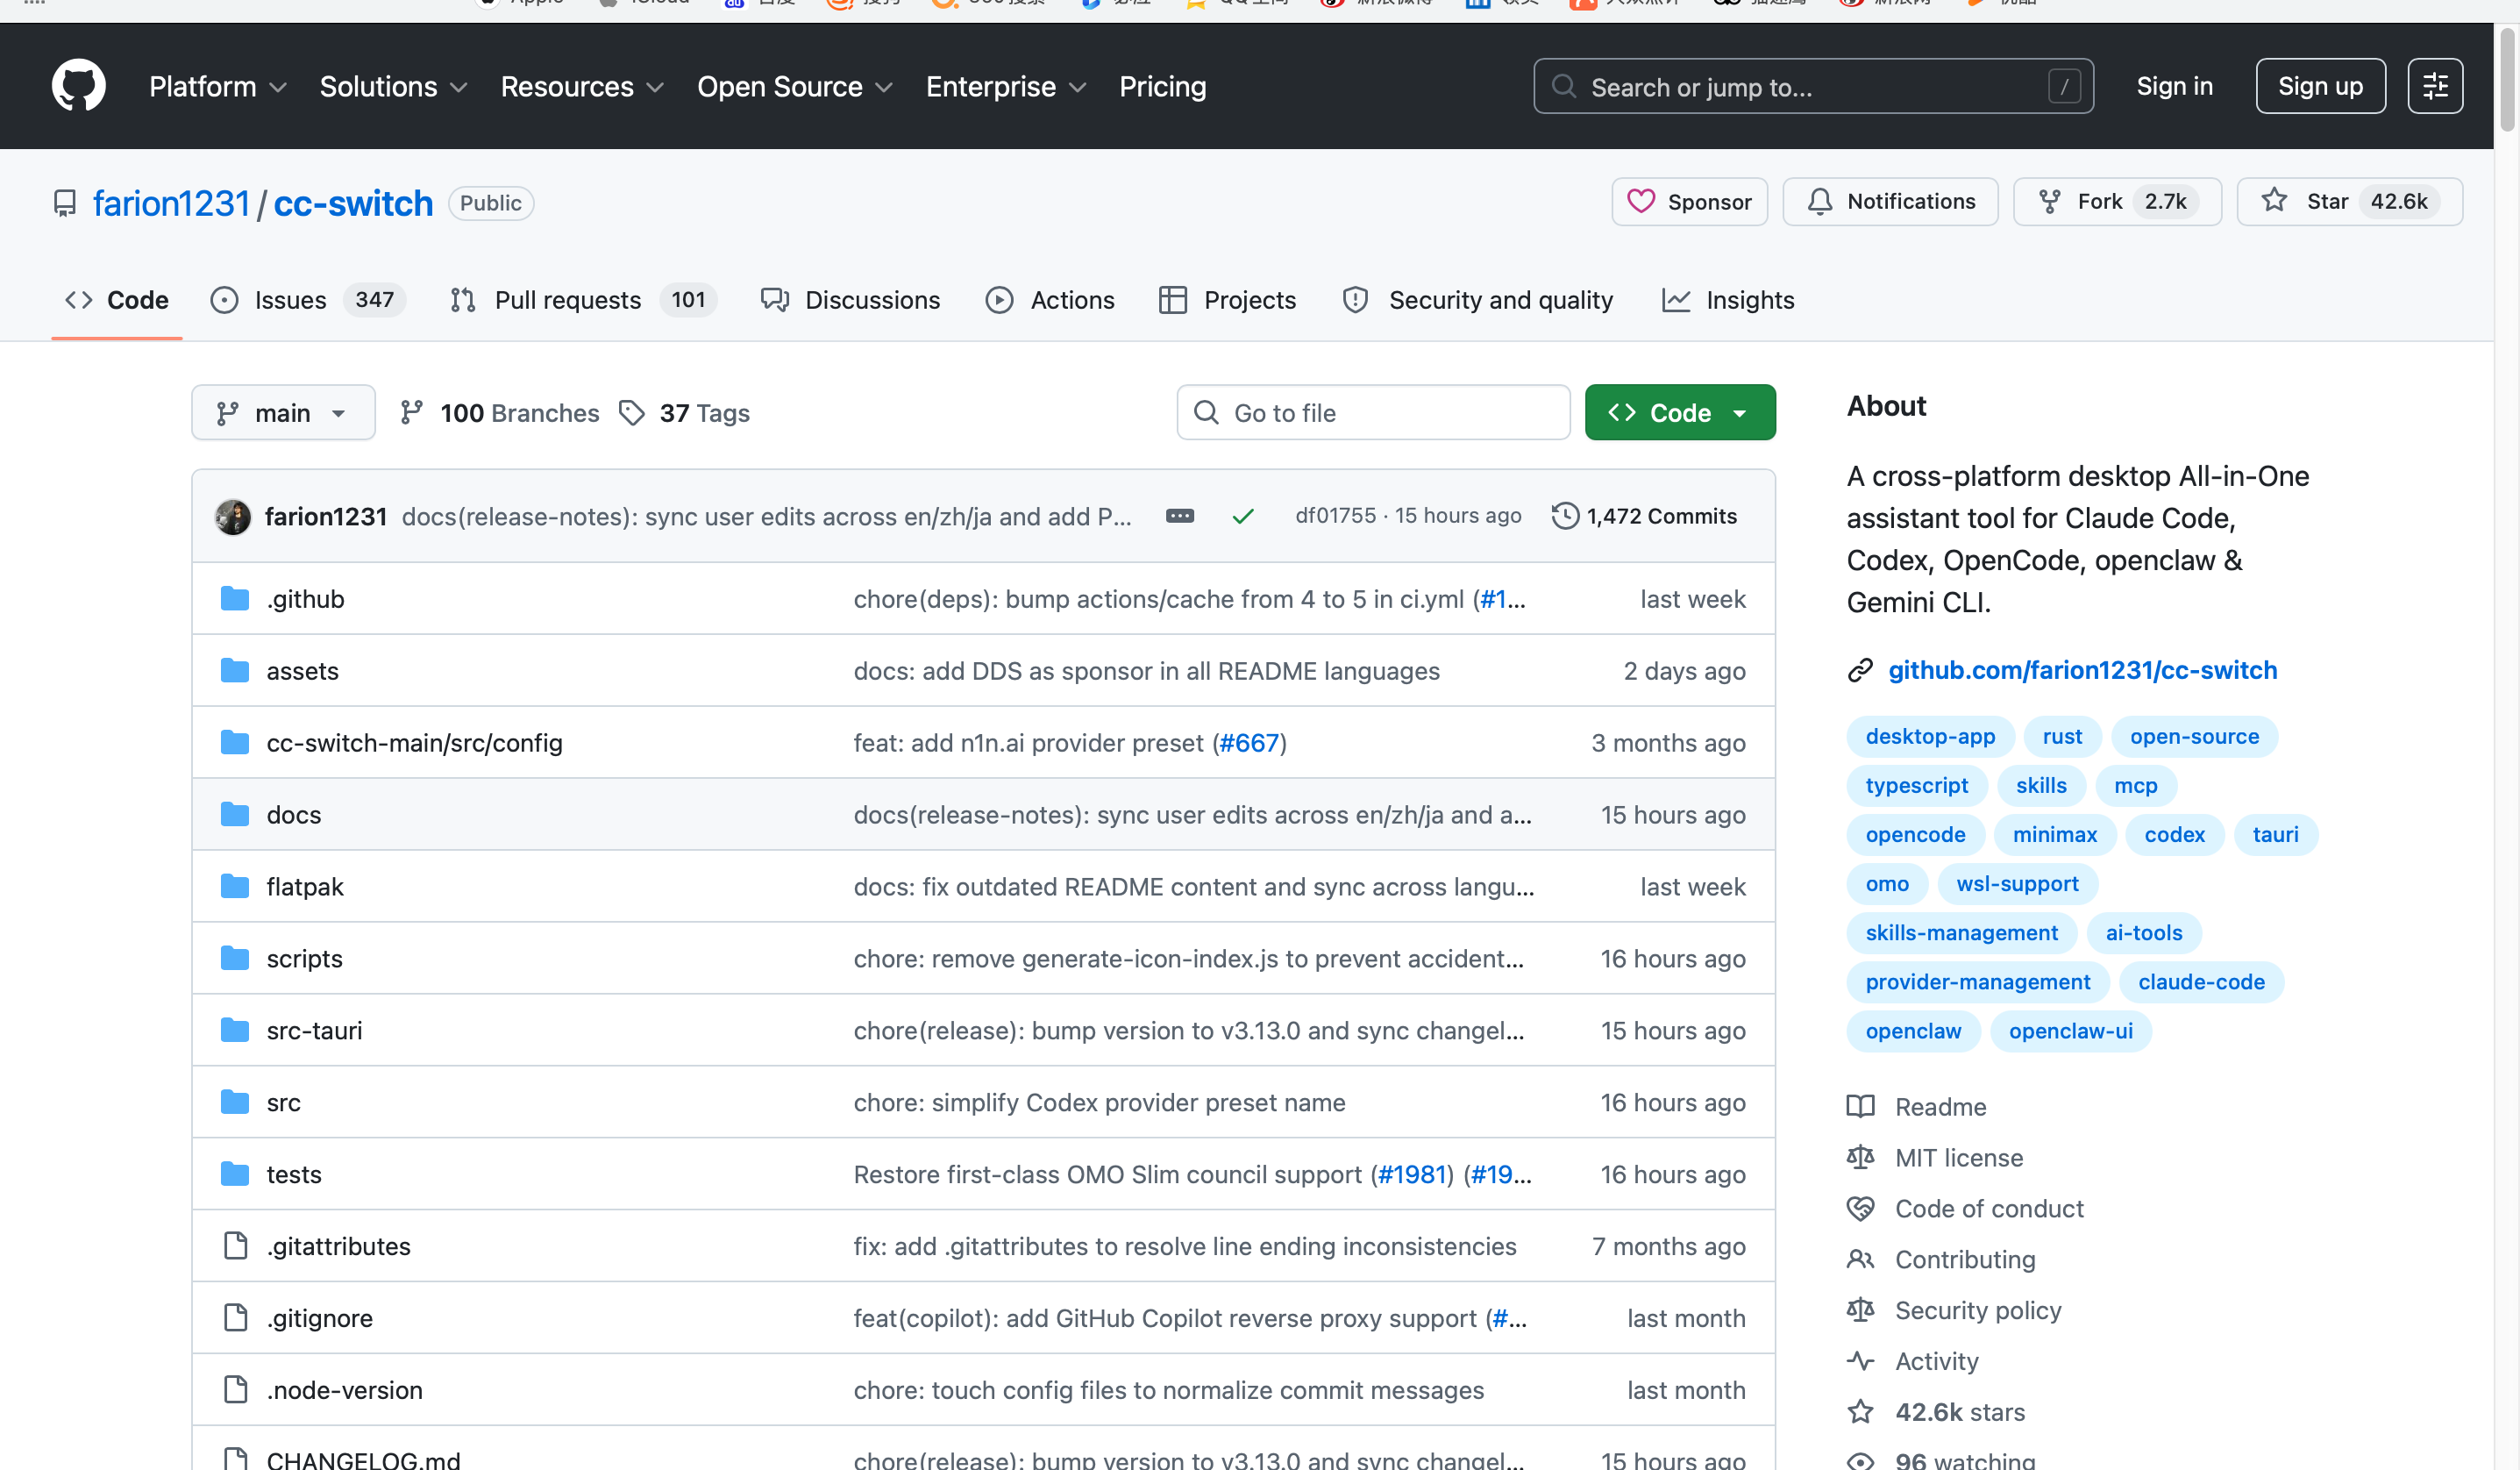
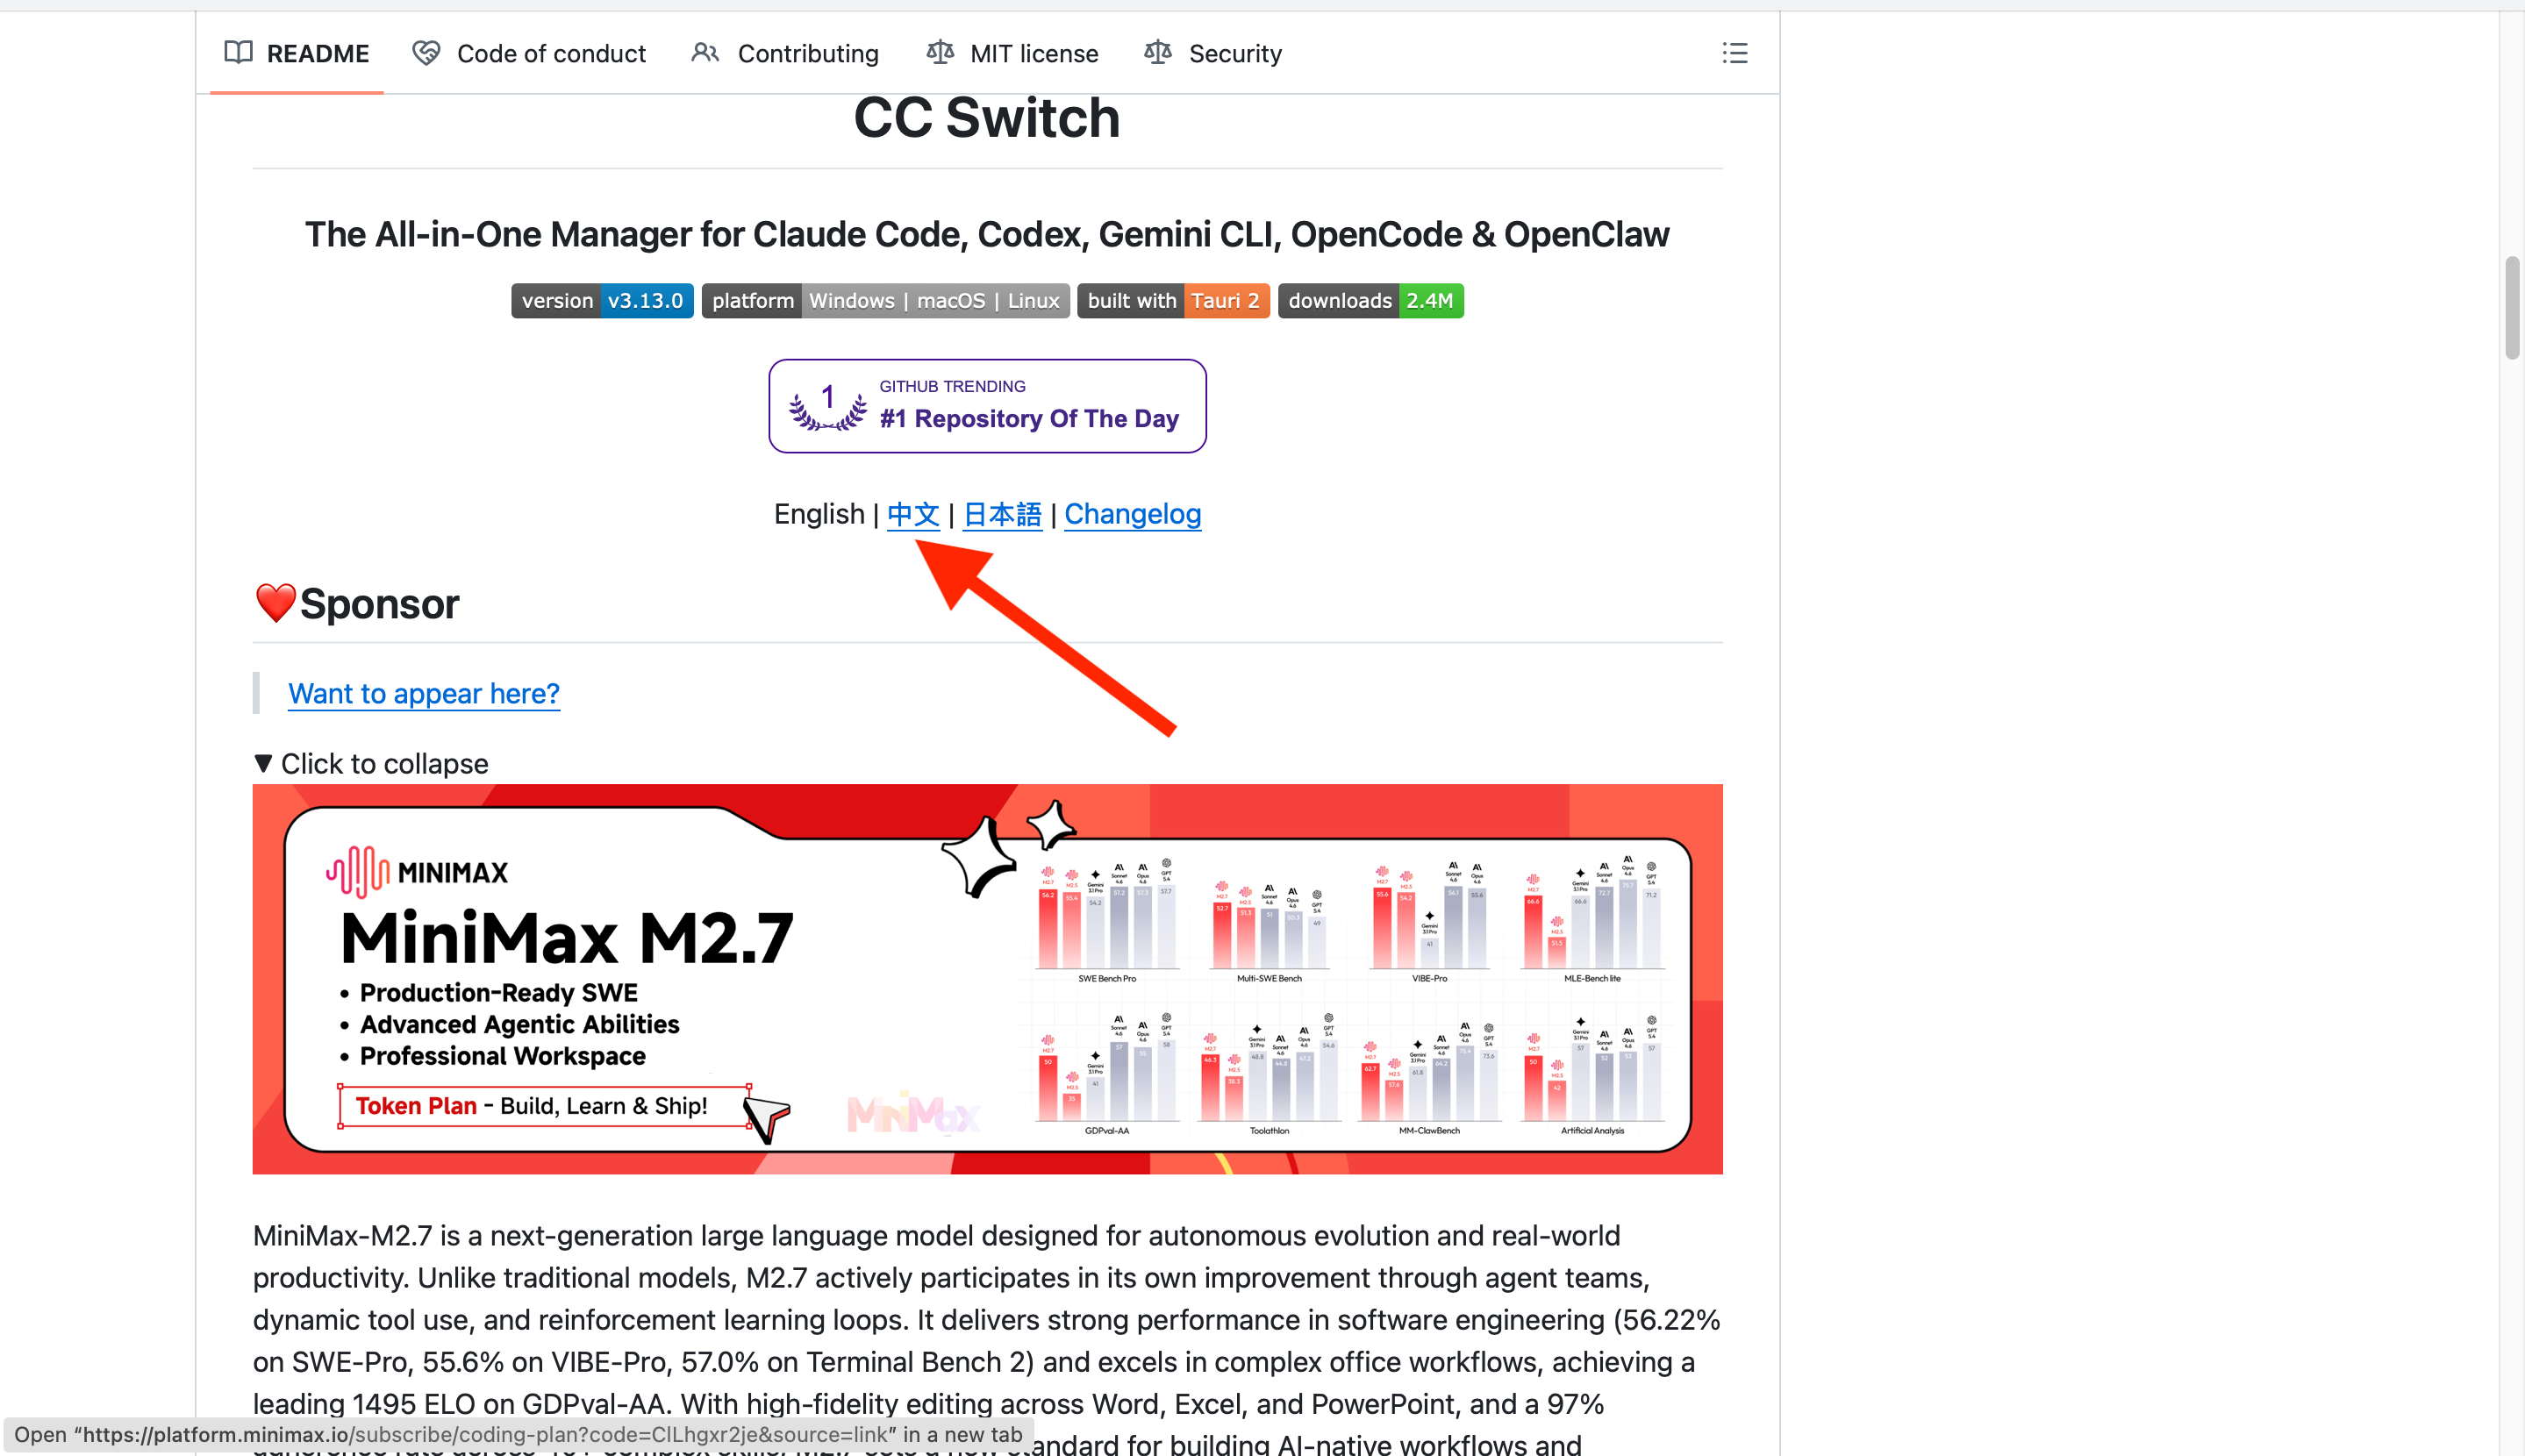
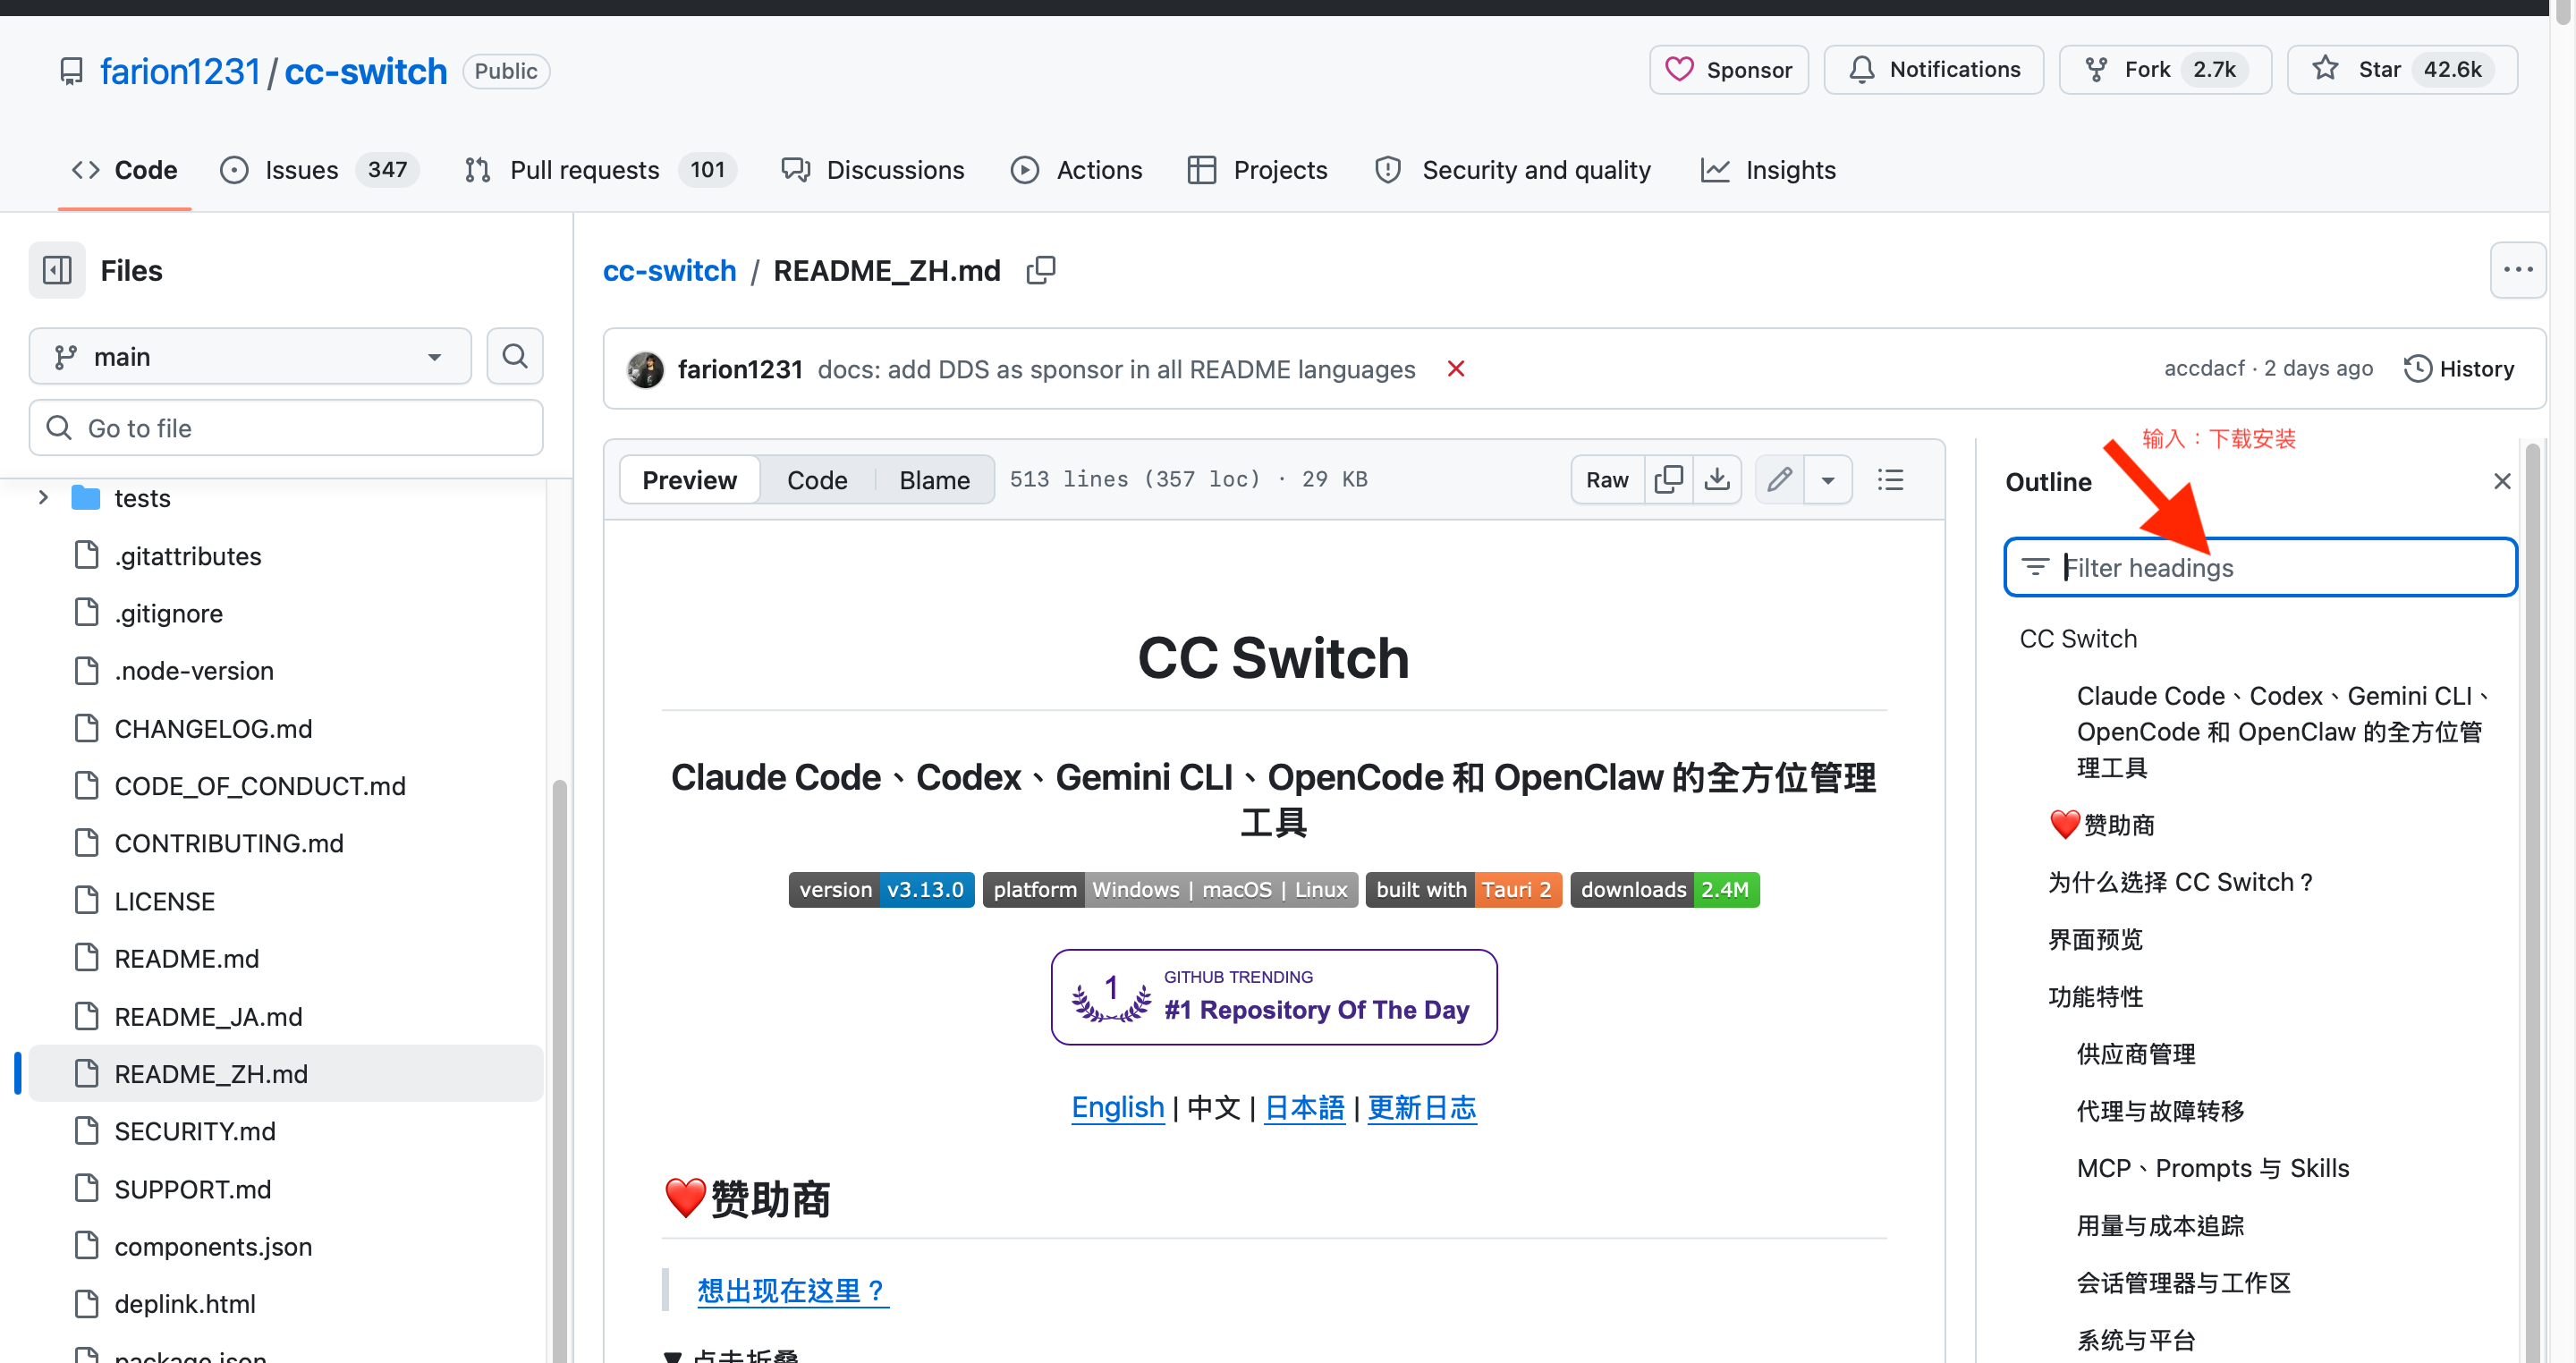
- Click the 中文 link at the top of the README:
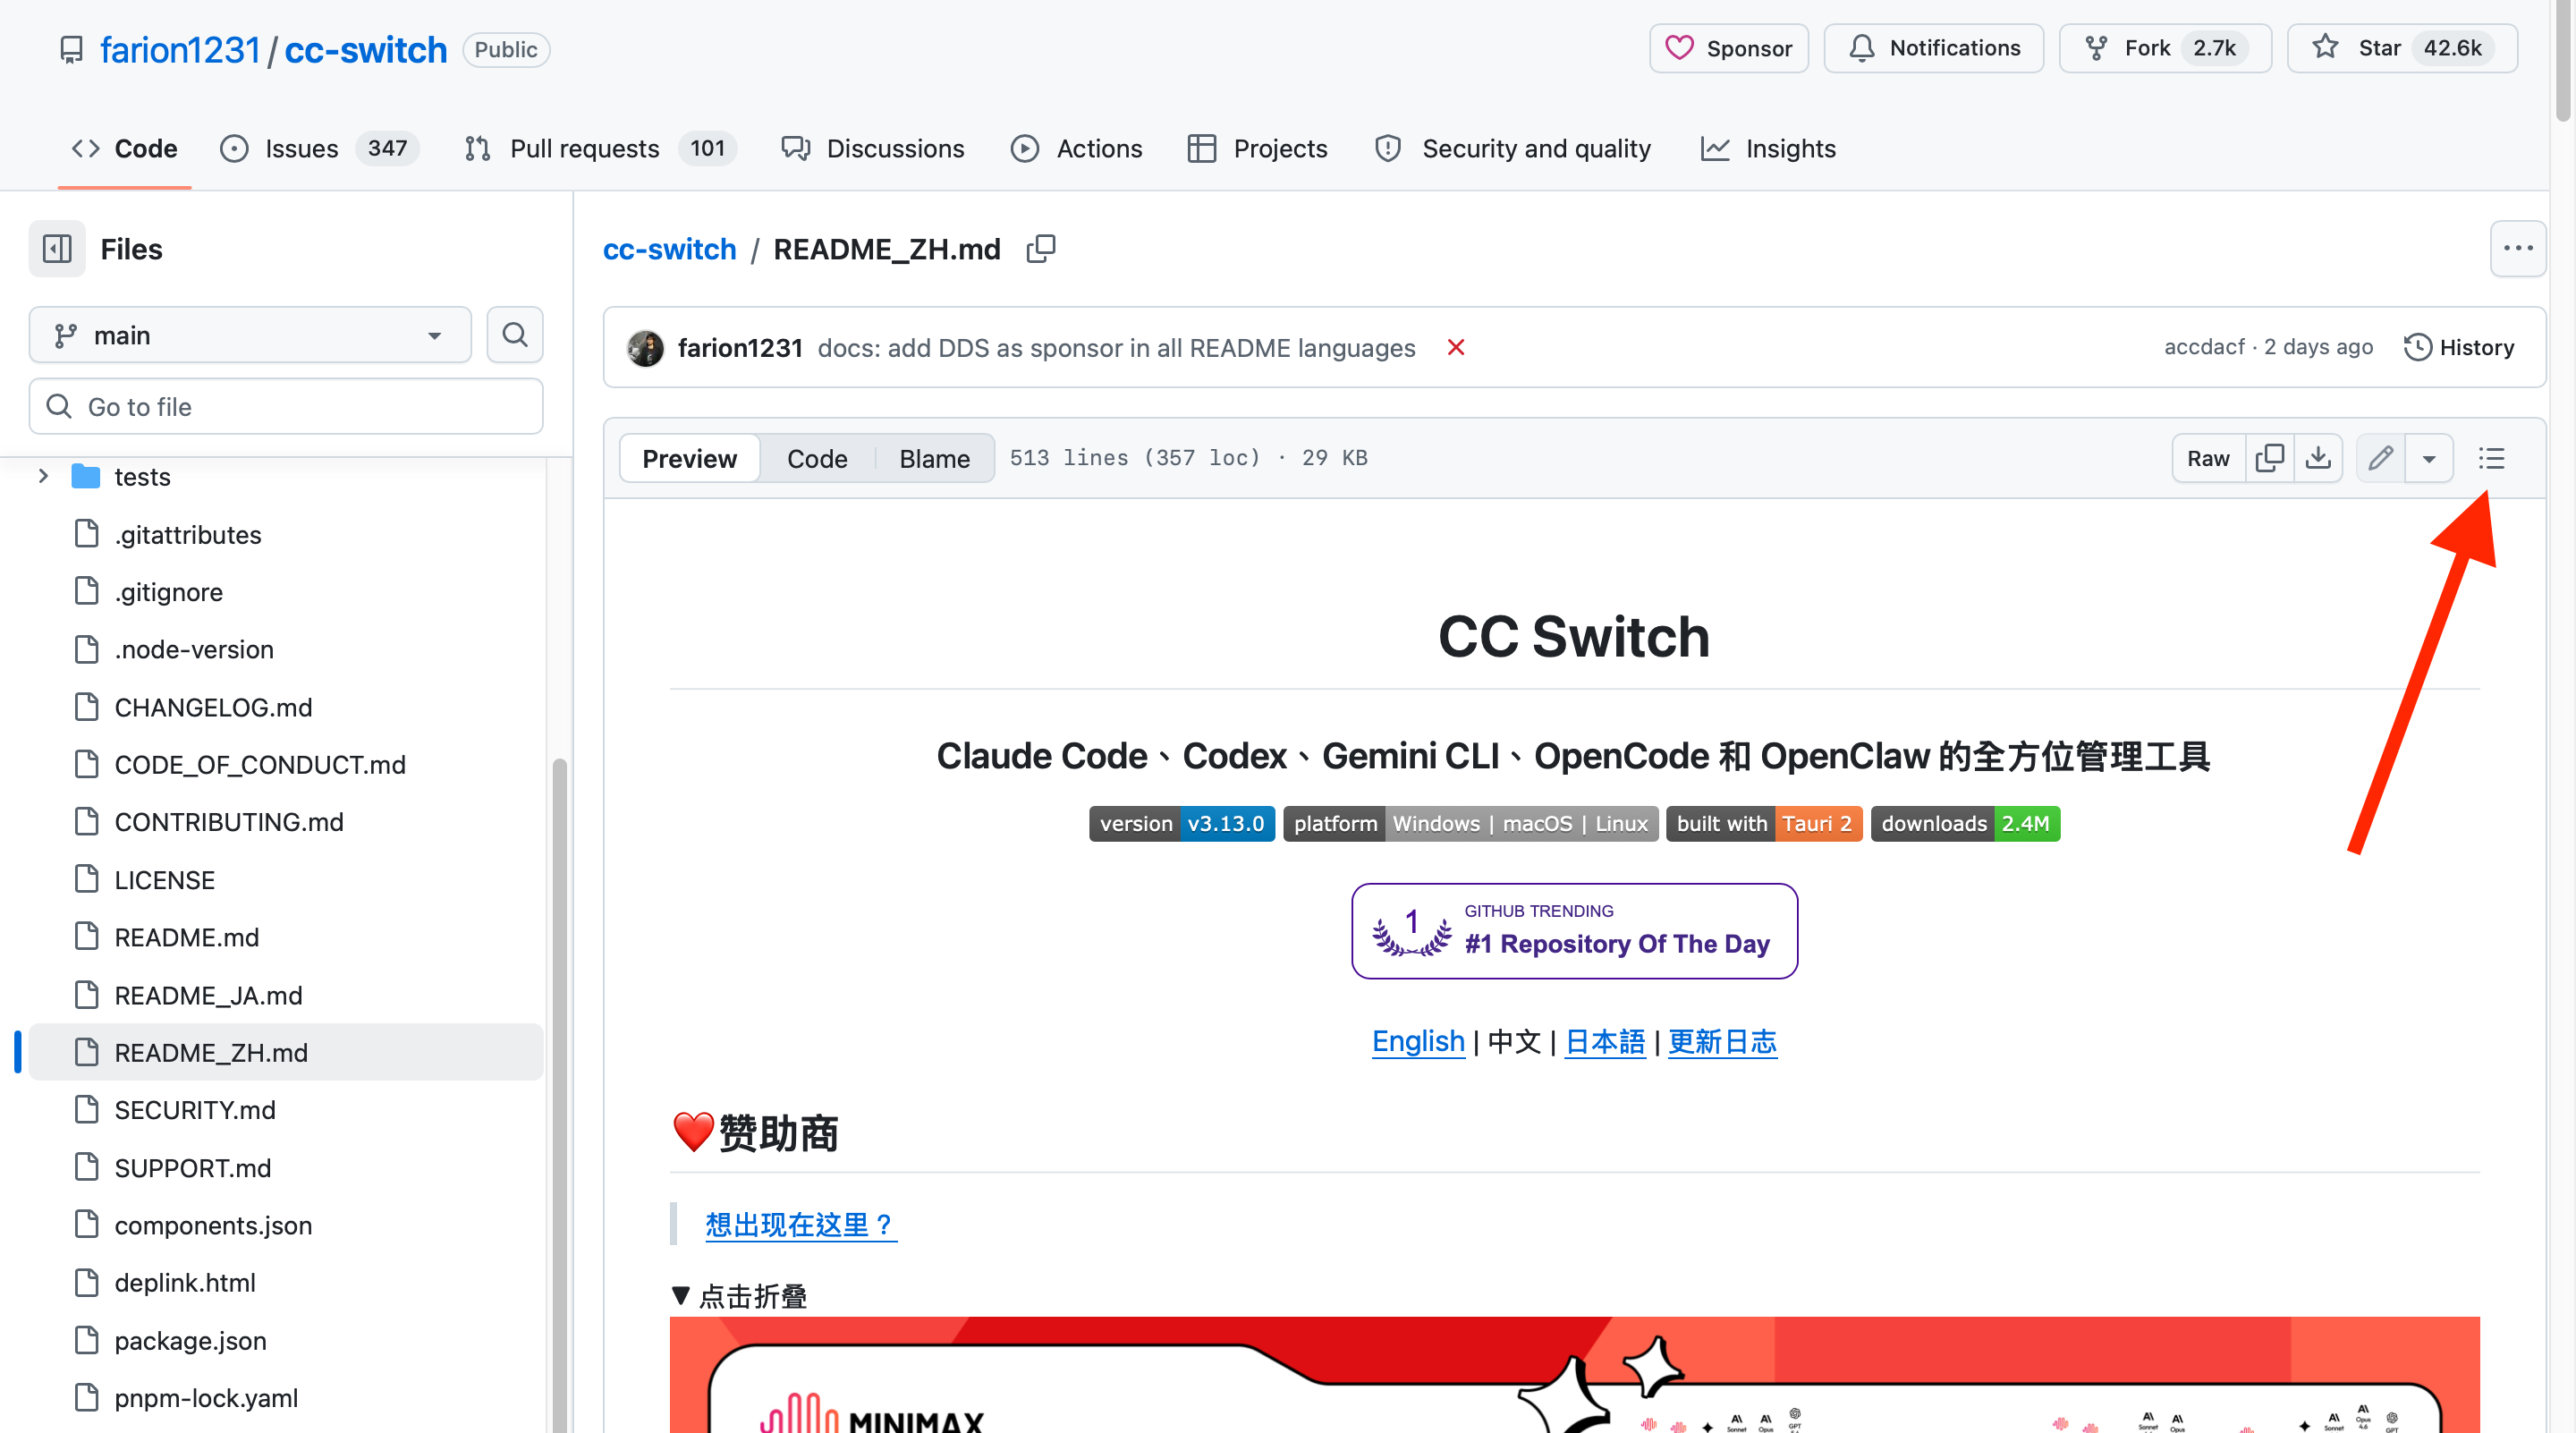
- Enter the Chinese README and click the table-of-contents button in the top-right corner:
- Enter 下载安装 in the directory search box, then click to jump:
- Jump to the download and installation section and see the system requirements and Releases link:
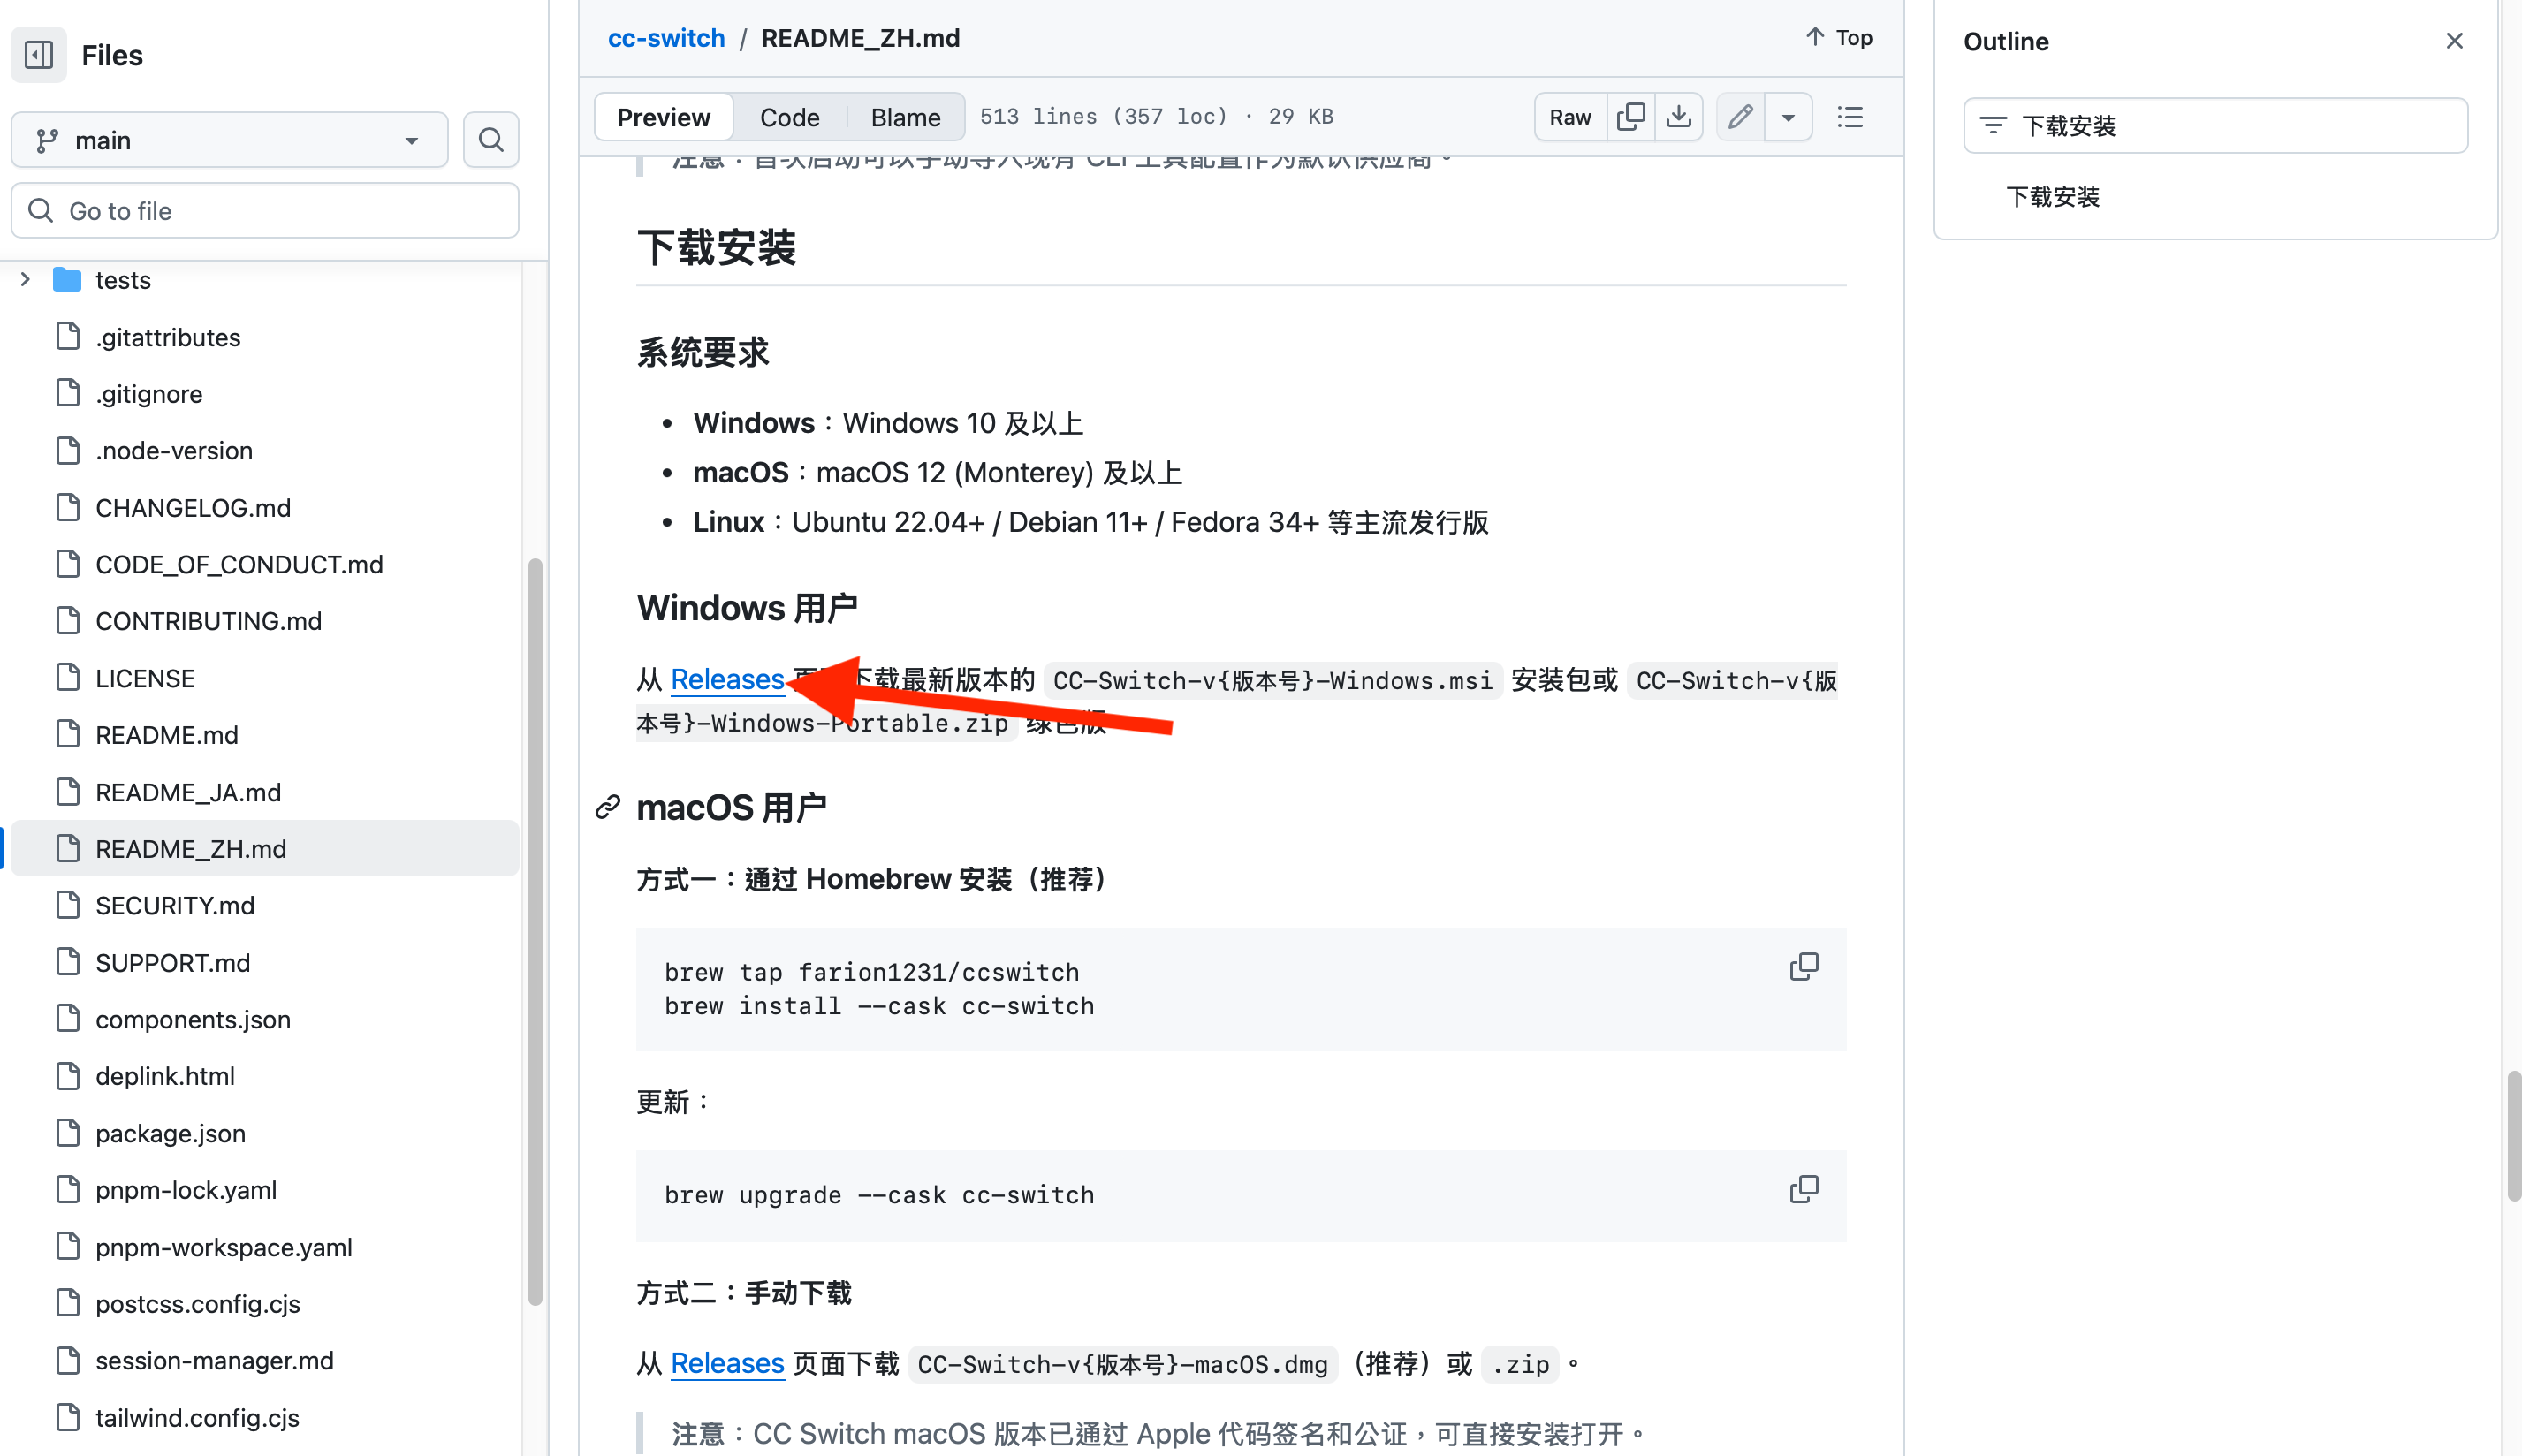
For Mac users:
- Click the Releases link to enter the version page. Do not click the Chinese version; scroll down directly:

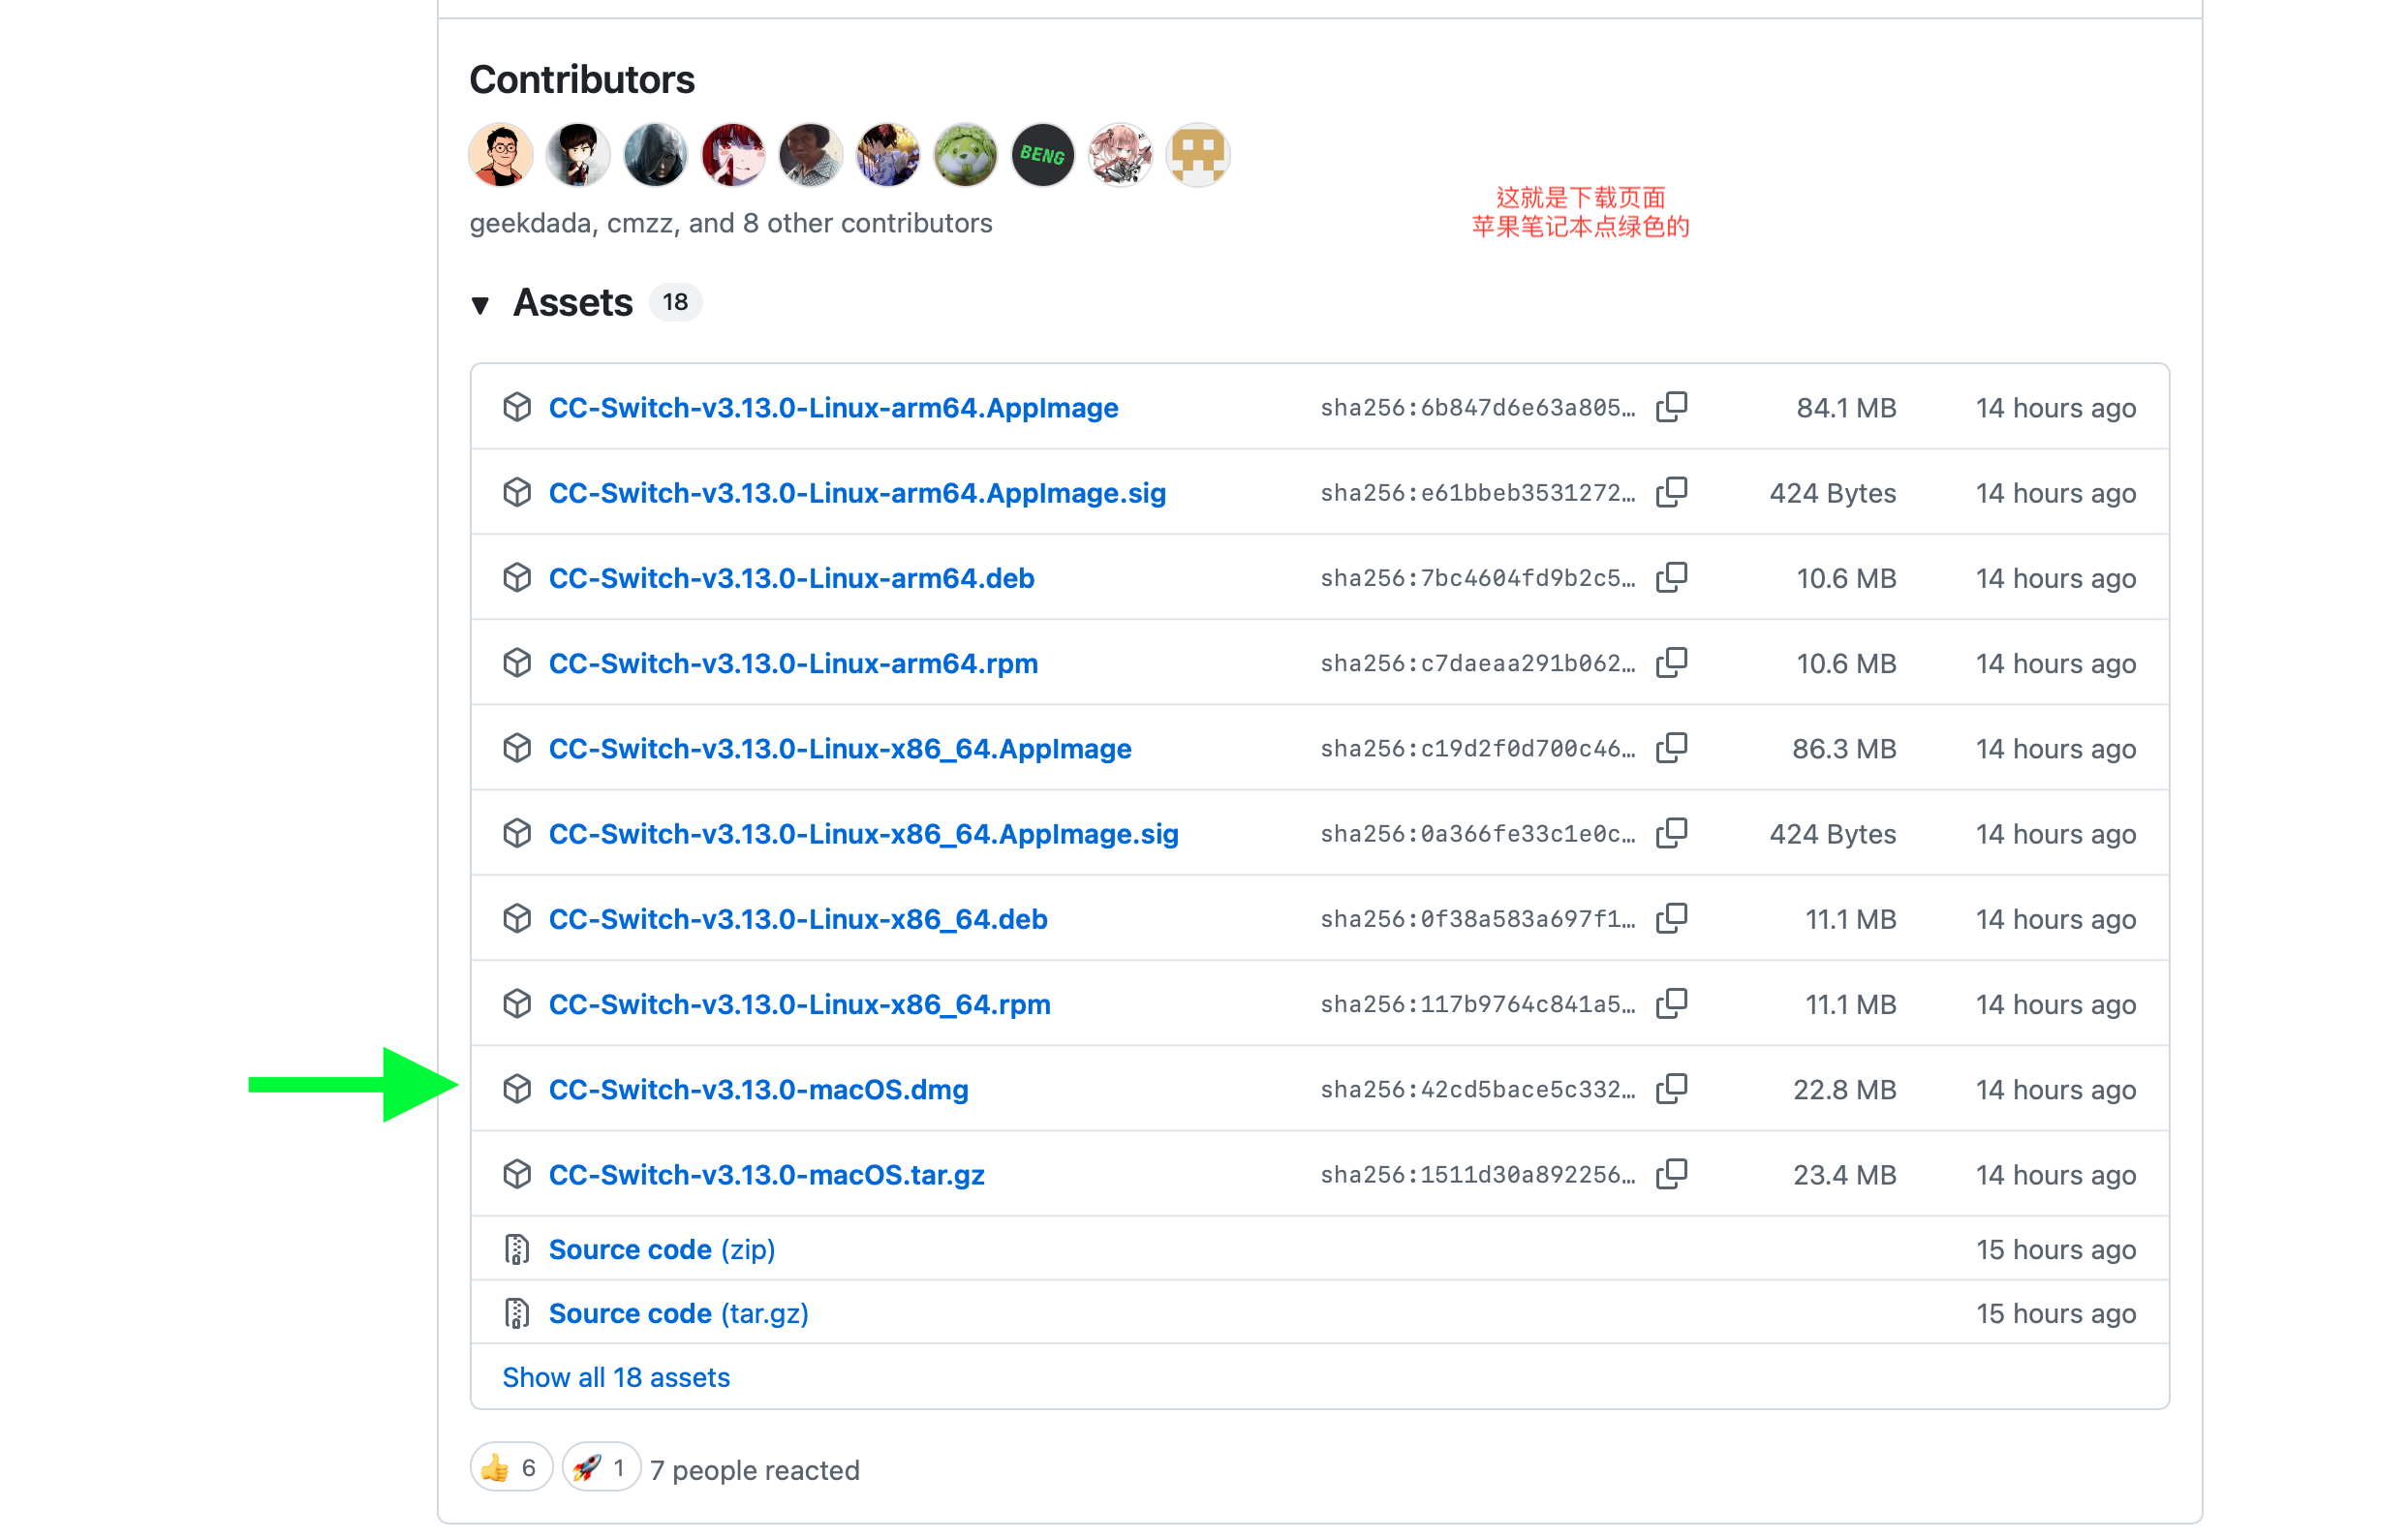
- In the Assets file list, Mac users click the
.dmgfile indicated by the green arrow to download:
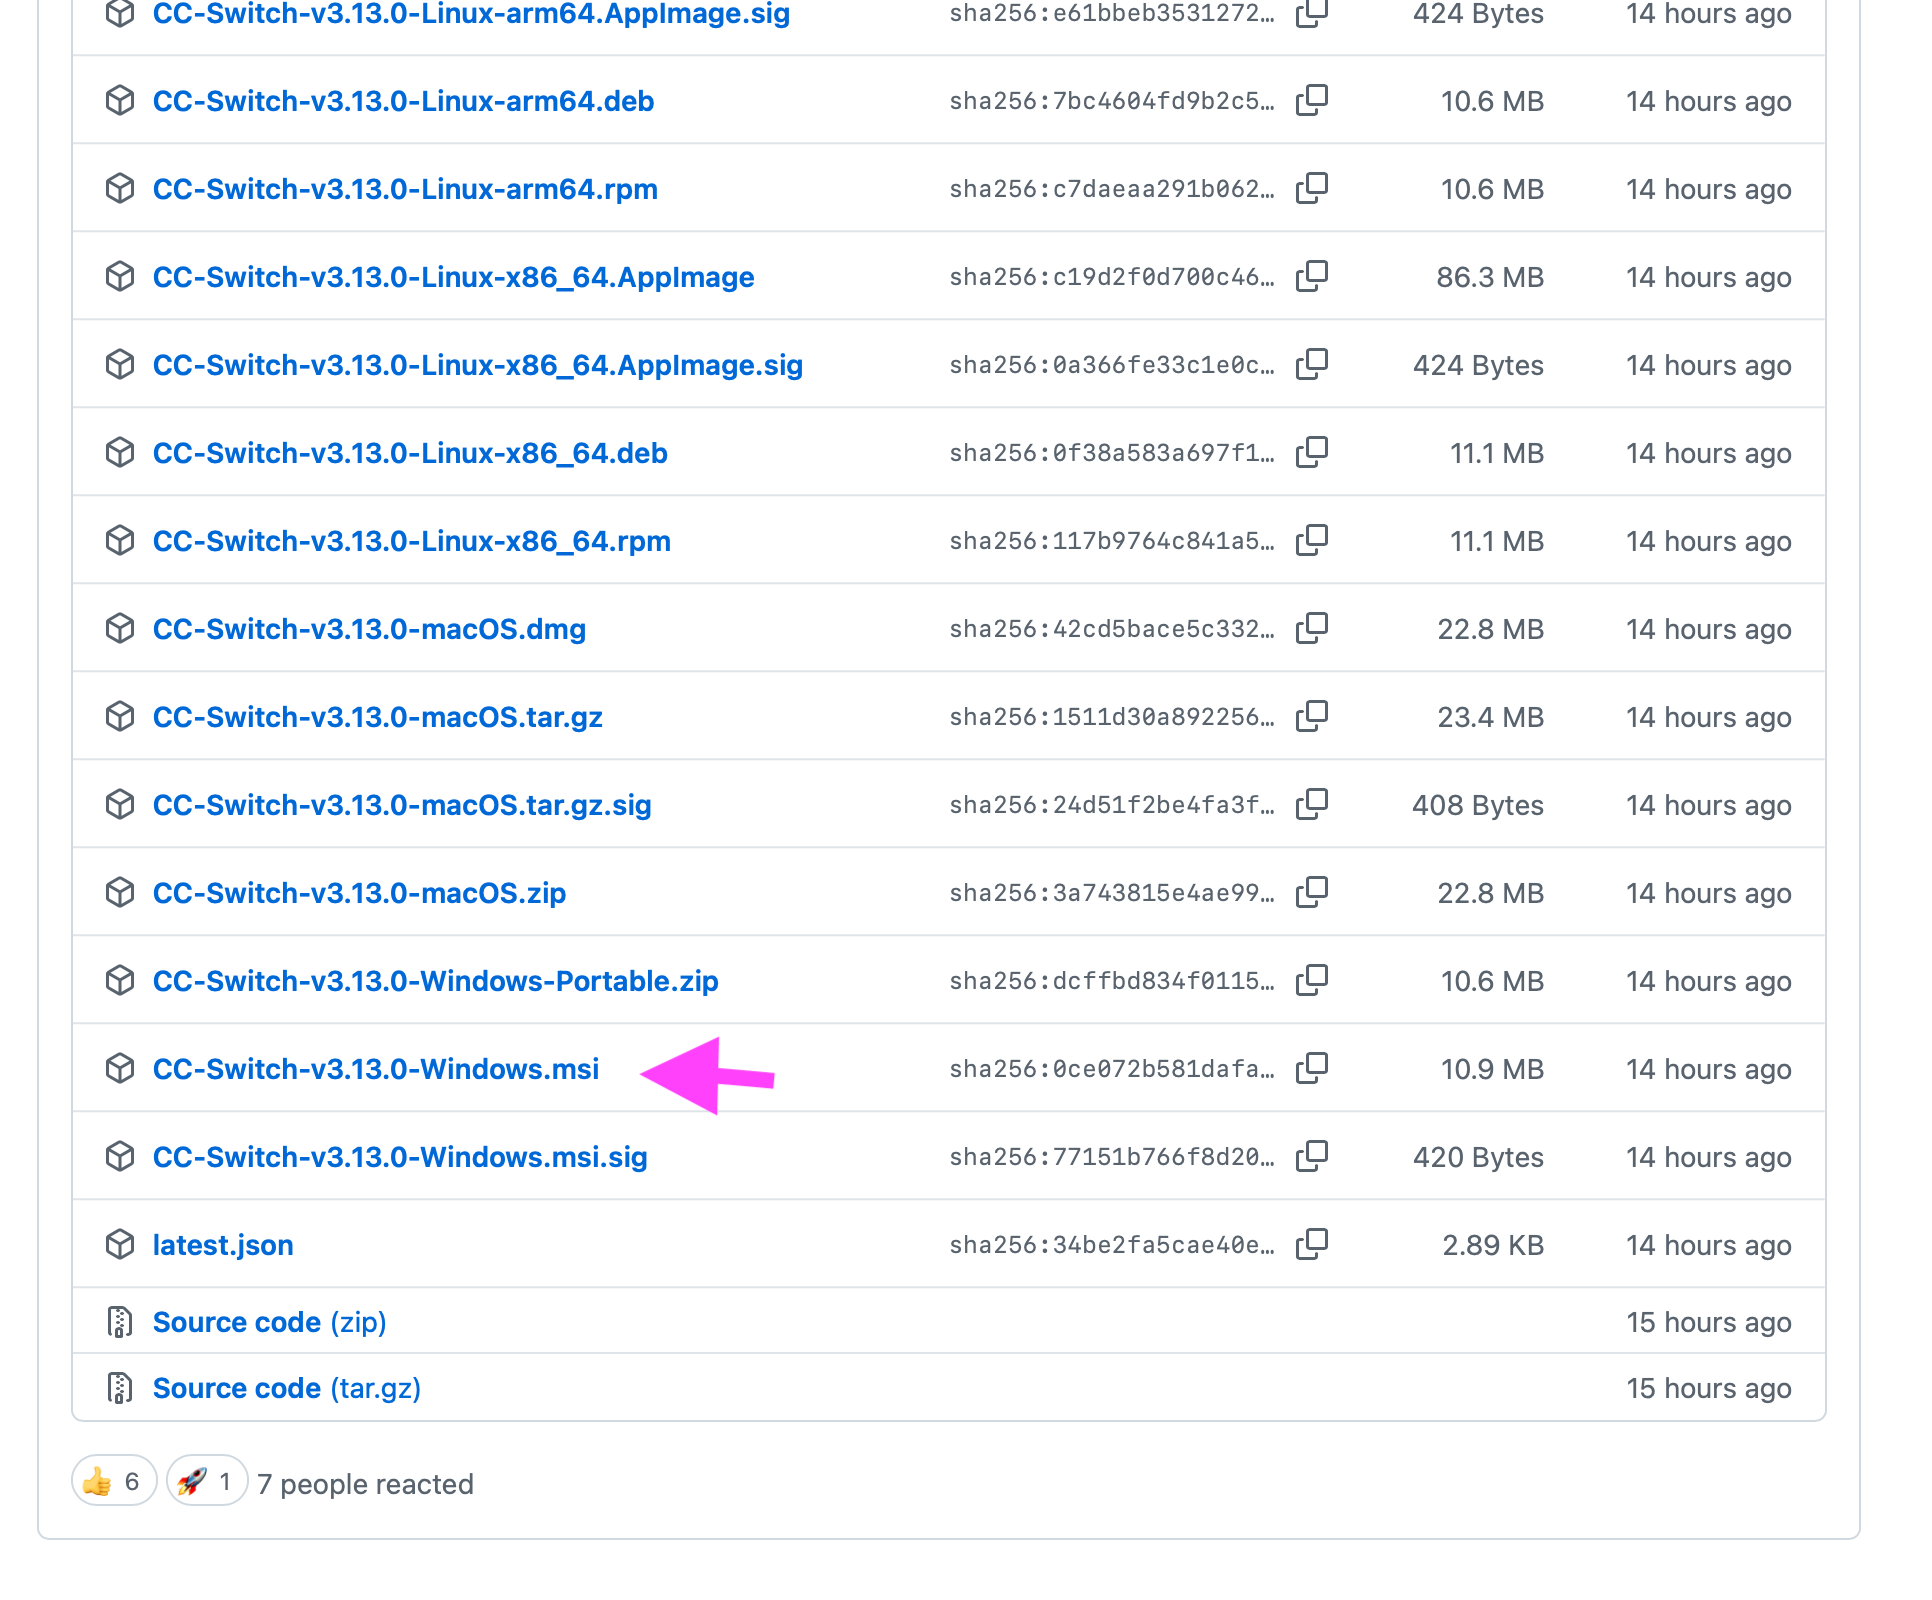
For Windows users:
- Click Show all 18 assets to expand the full list:
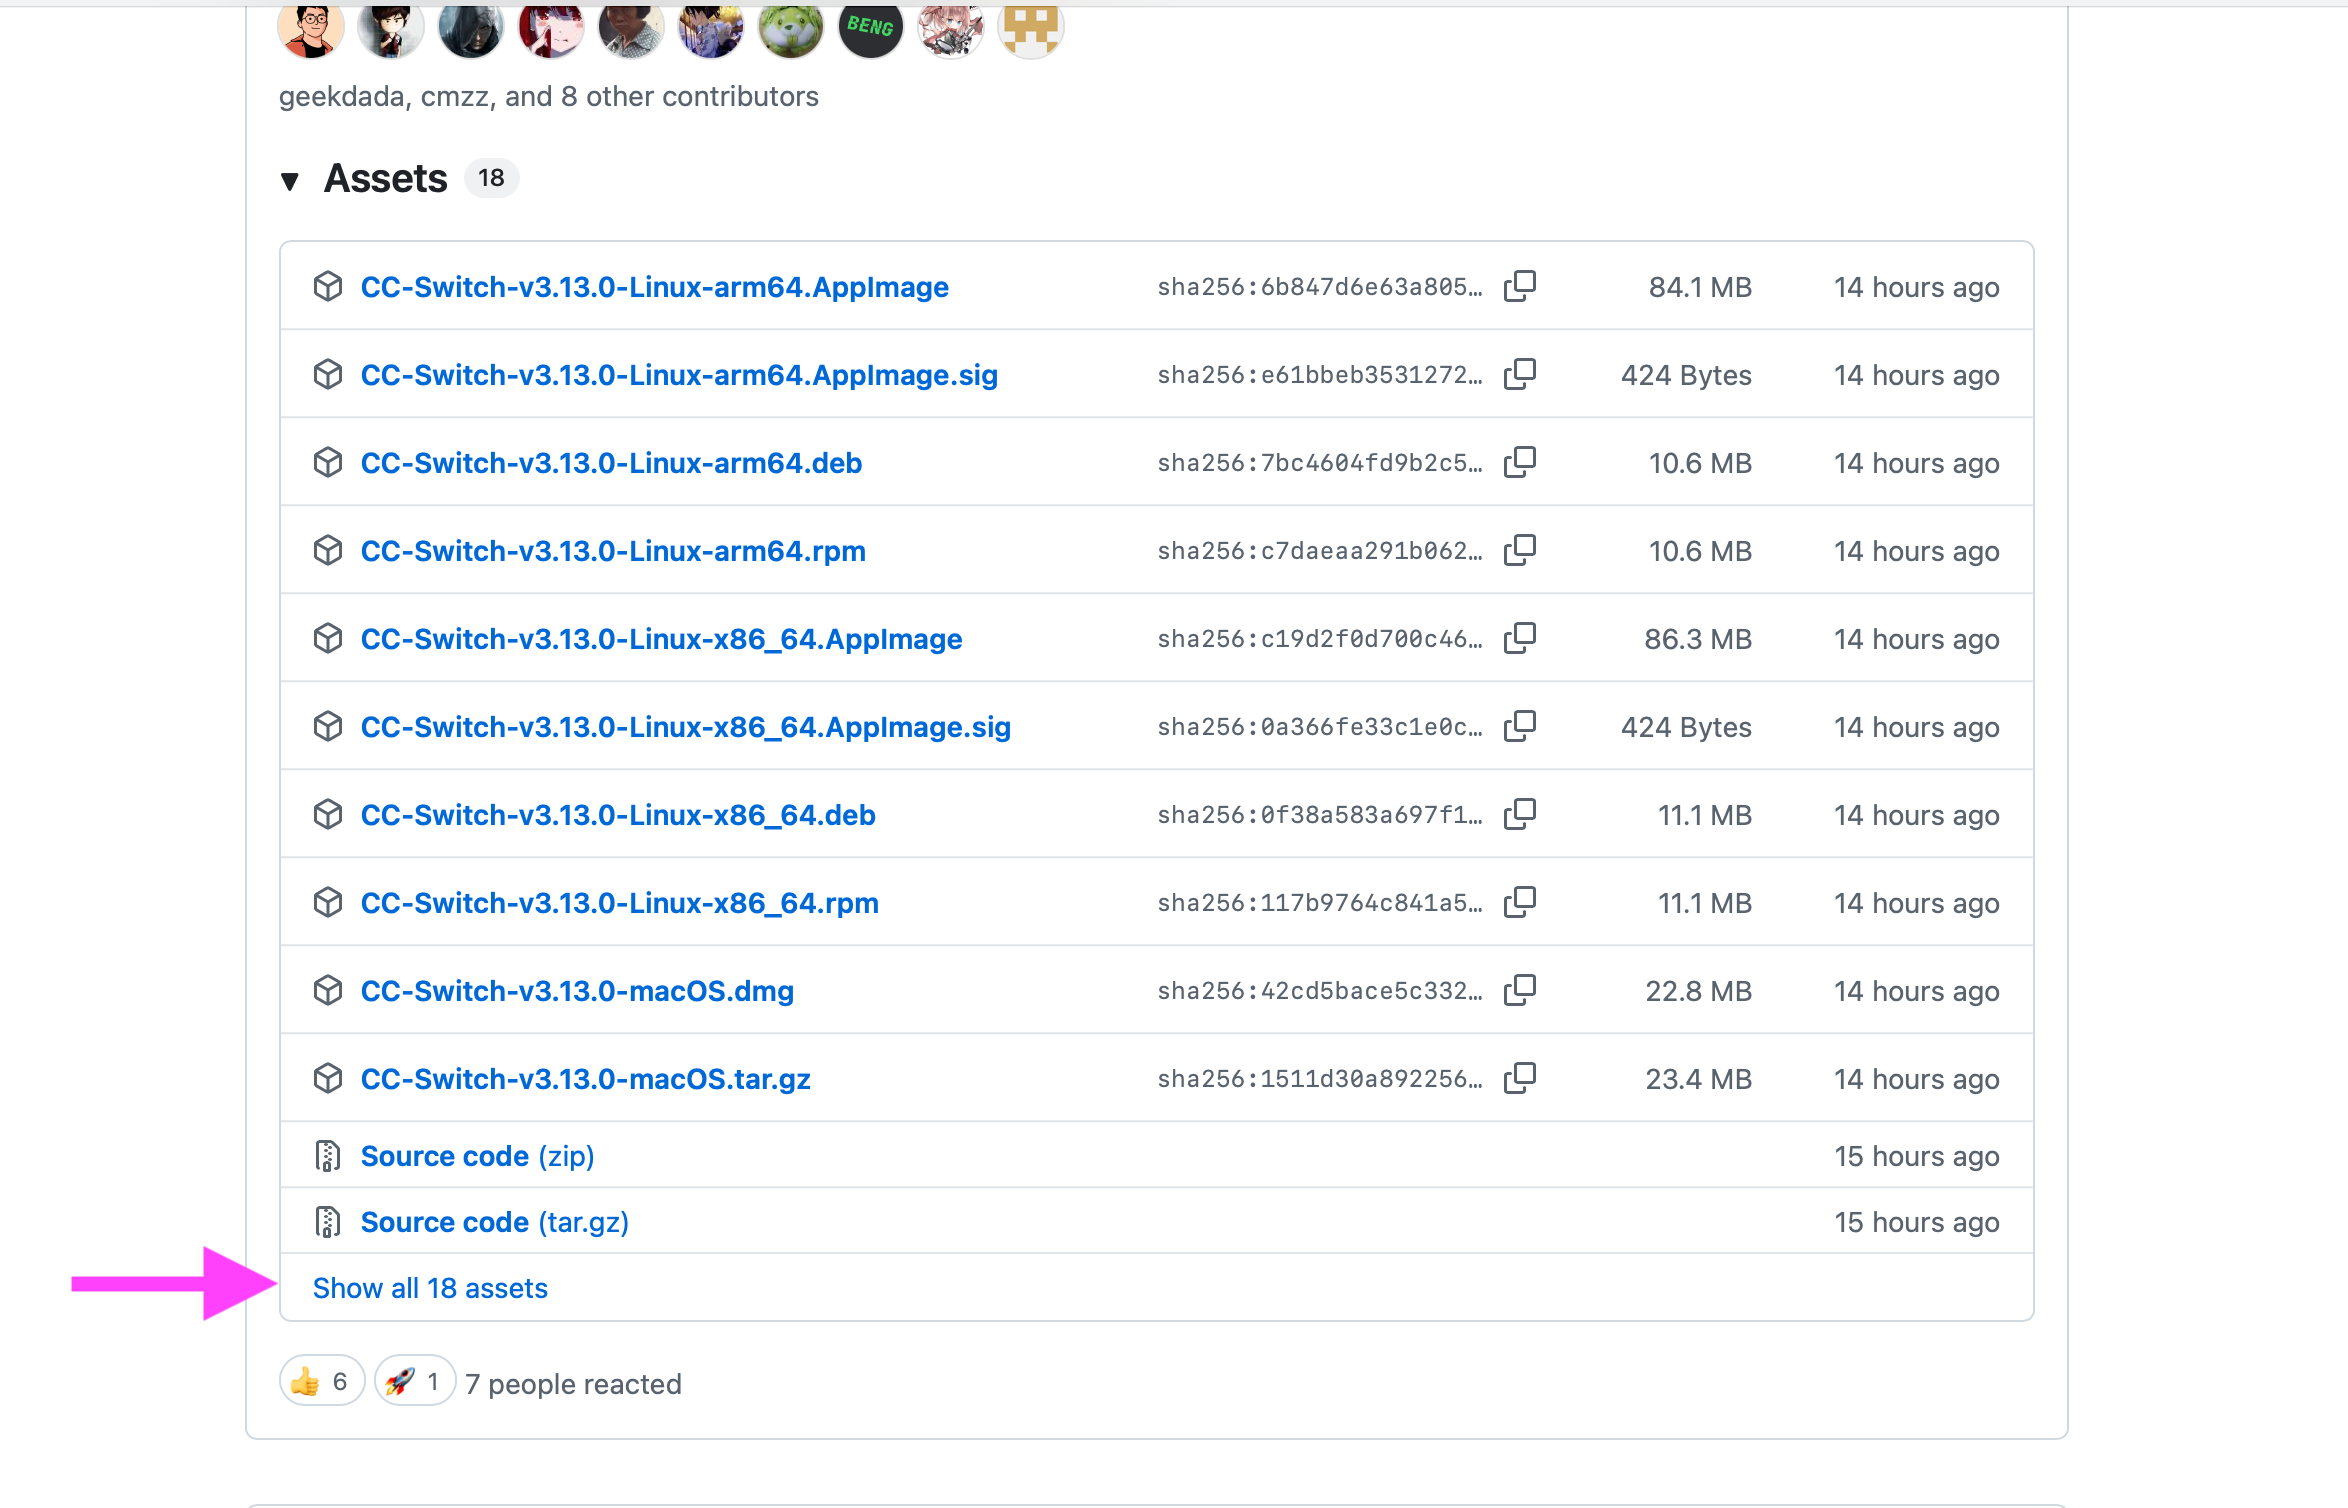
- After expansion, Windows users choose the
Windows.msiinstaller indicated by the pink arrow:
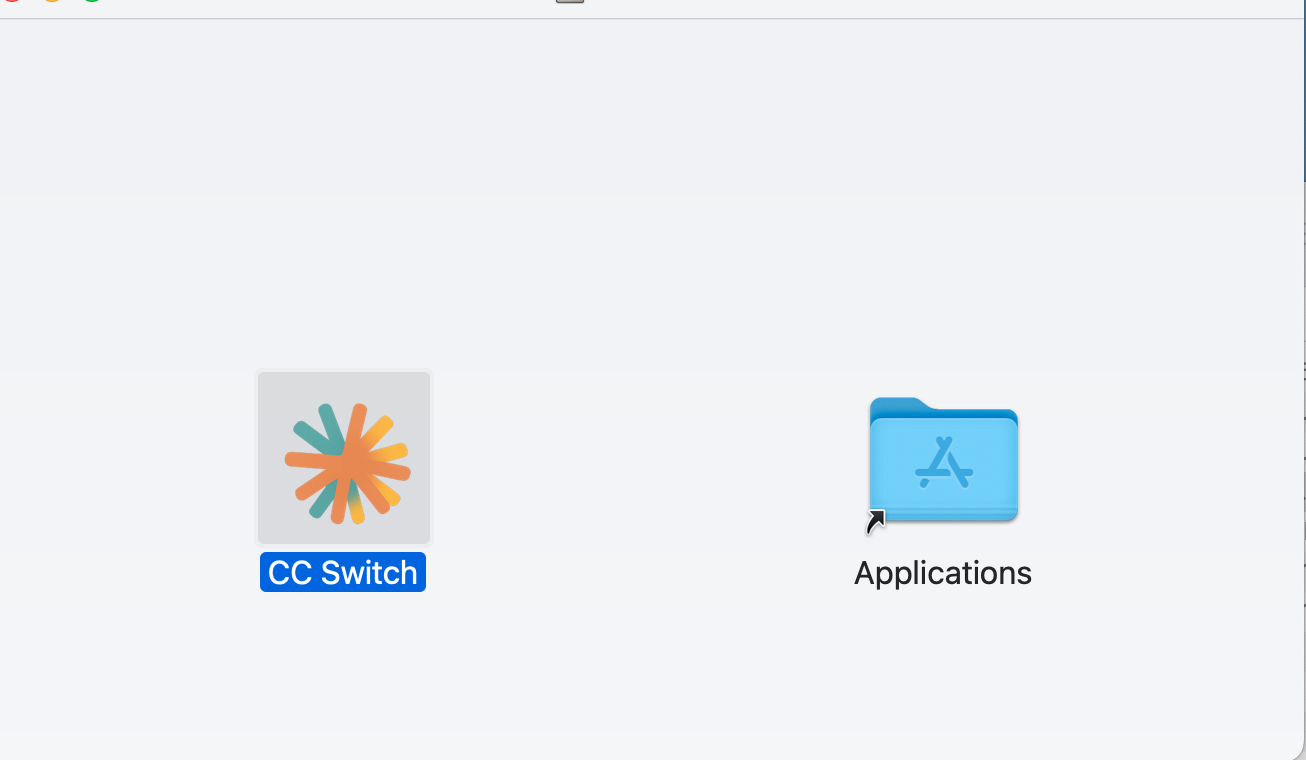
Mac installation: Open the downloaded dmg and drag the CC Switch icon into the Applications folder:
Windows installation: Double-click the .msi installer and follow the prompts to complete installation.
Step 6: Install the Node.js Environment
Note: CLI tools managed by CC Switch (Claude Code, Codex, Gemini CLI) require the Node.js environment.
If you encounter any issue, follow the method in Section VIII and use Doubao to troubleshoot. Set the goal to "install the latest Node.js LTS version on my computer and confirm it works normally".
Windows installation:
Open PowerShell (press Win -> type PowerShell -> open it), then copy:
winget install OpenJS.NodeJS.LTS
If confirmation is prompted during installation, enter Y. After the terminal stops scrolling, verify:
node -v
npm -v
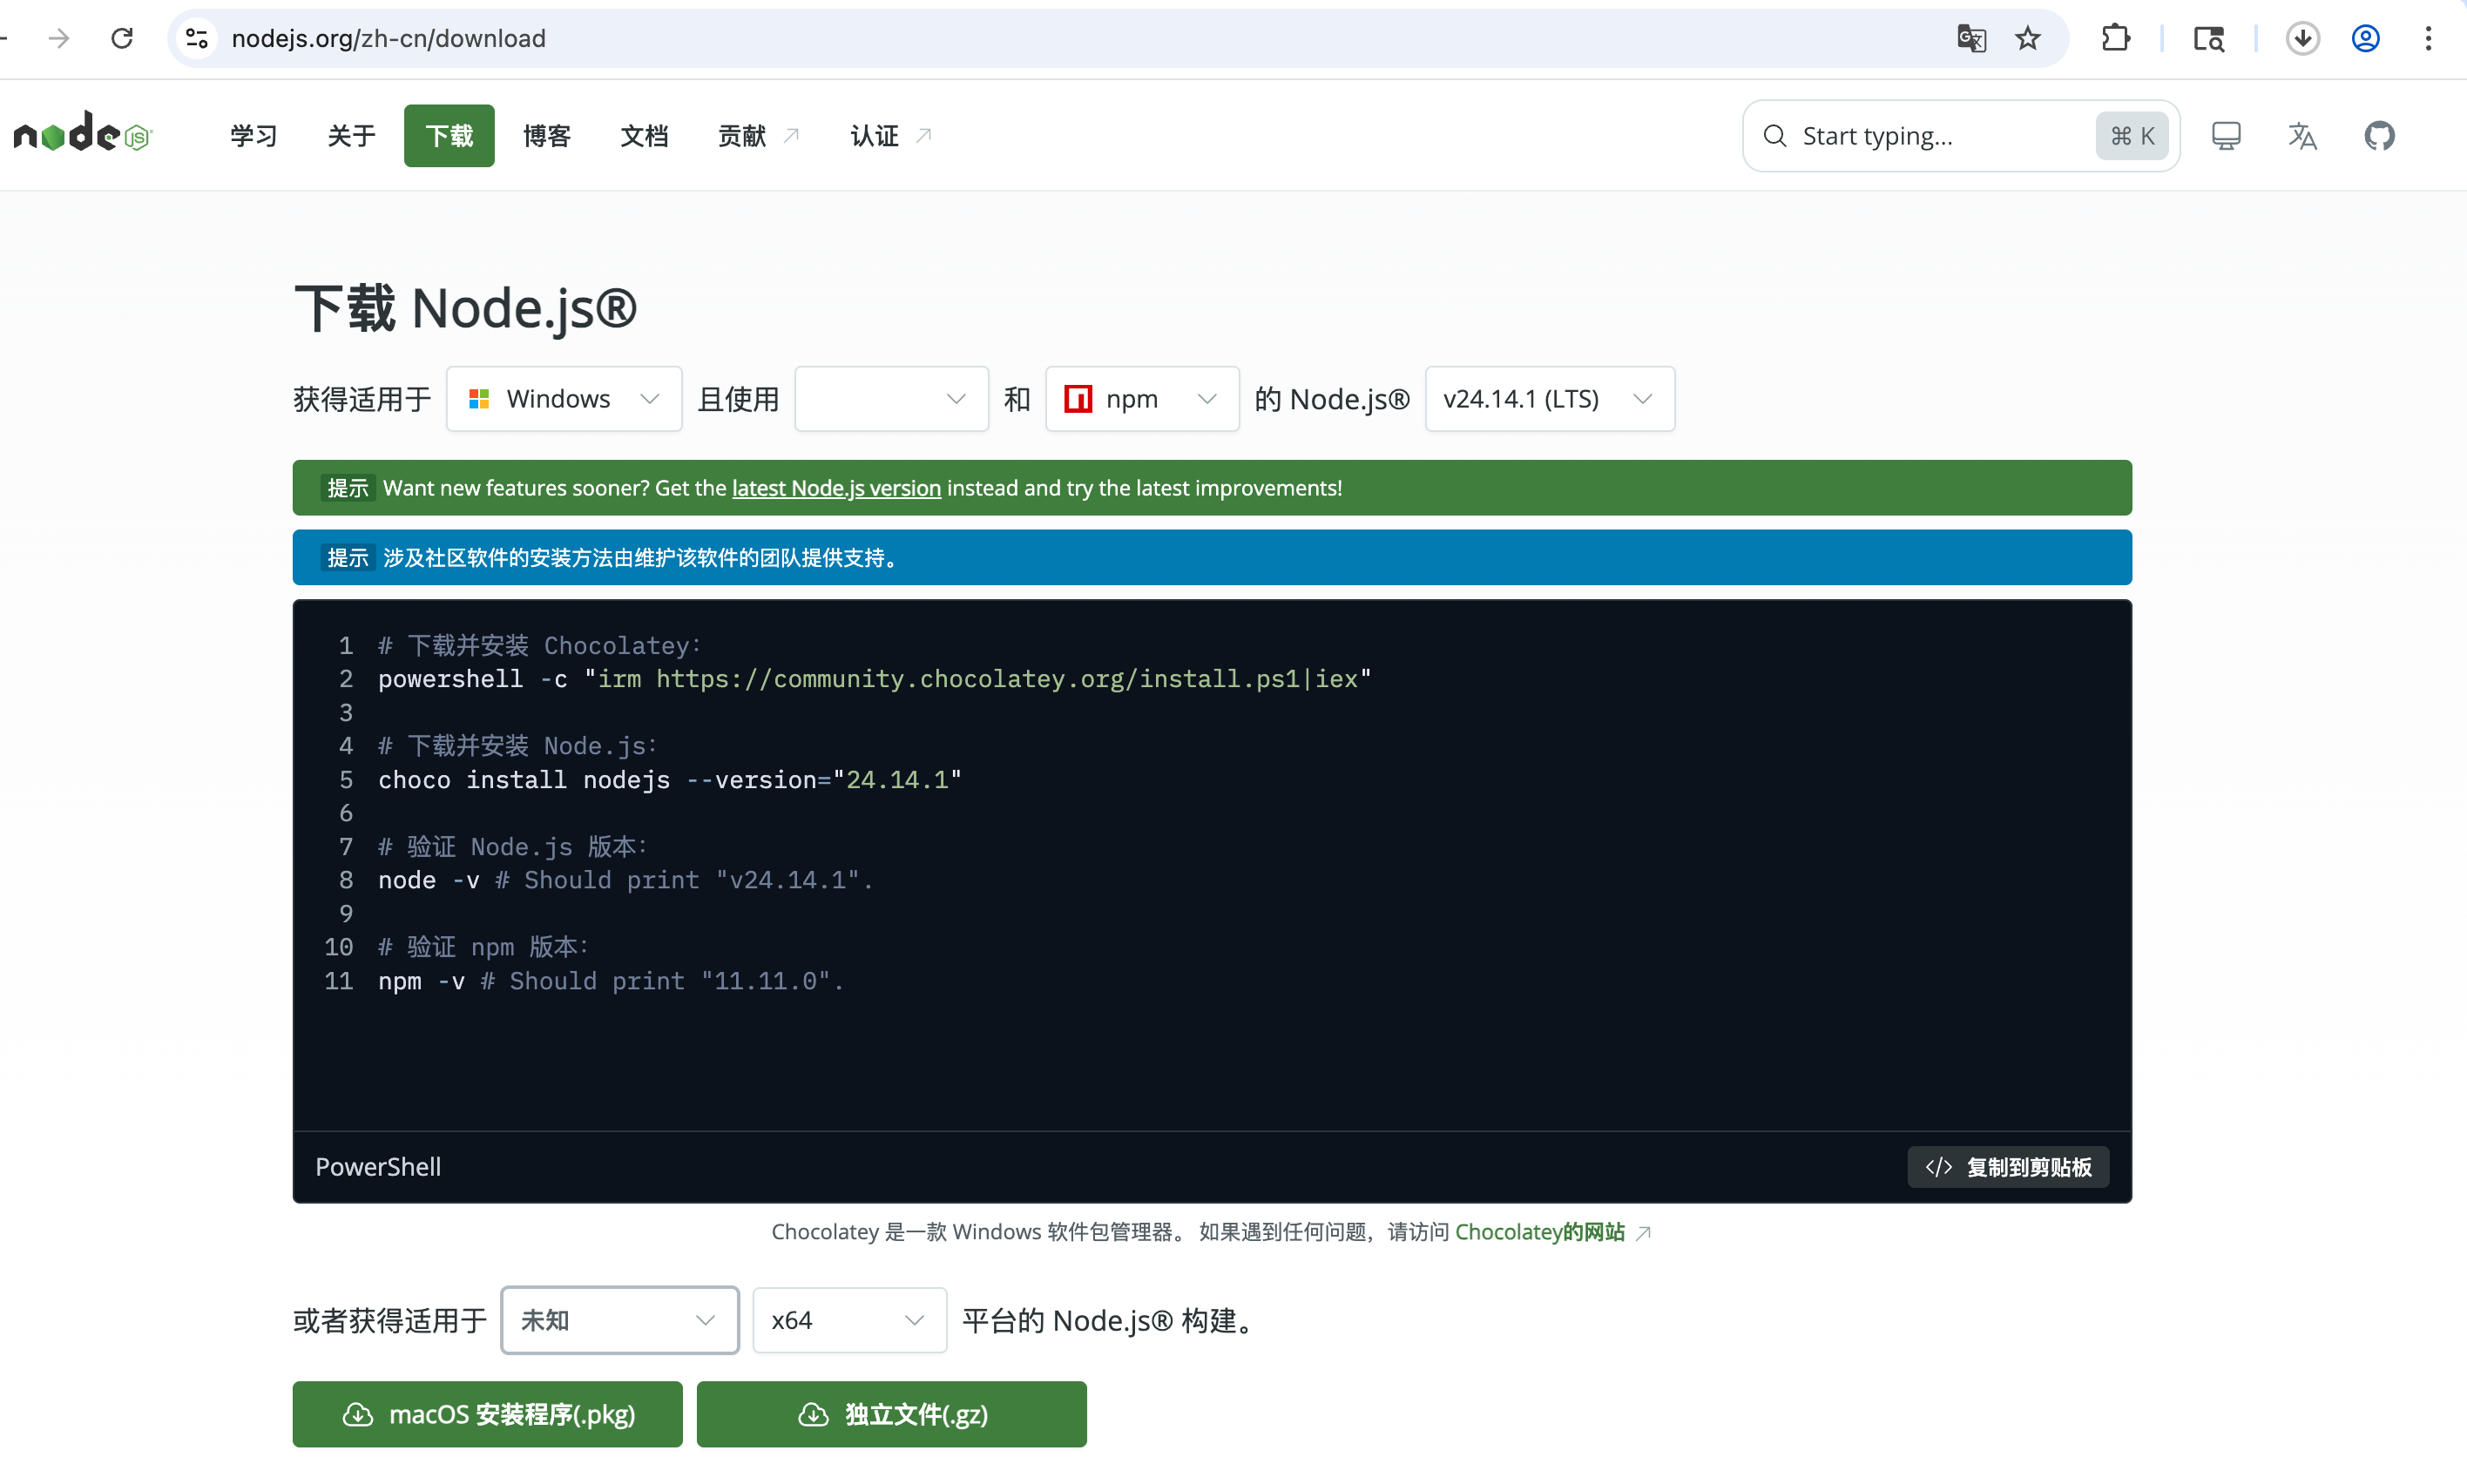
Seeing two version numbers means installation succeeded. The official website provides complete Windows installation commands:
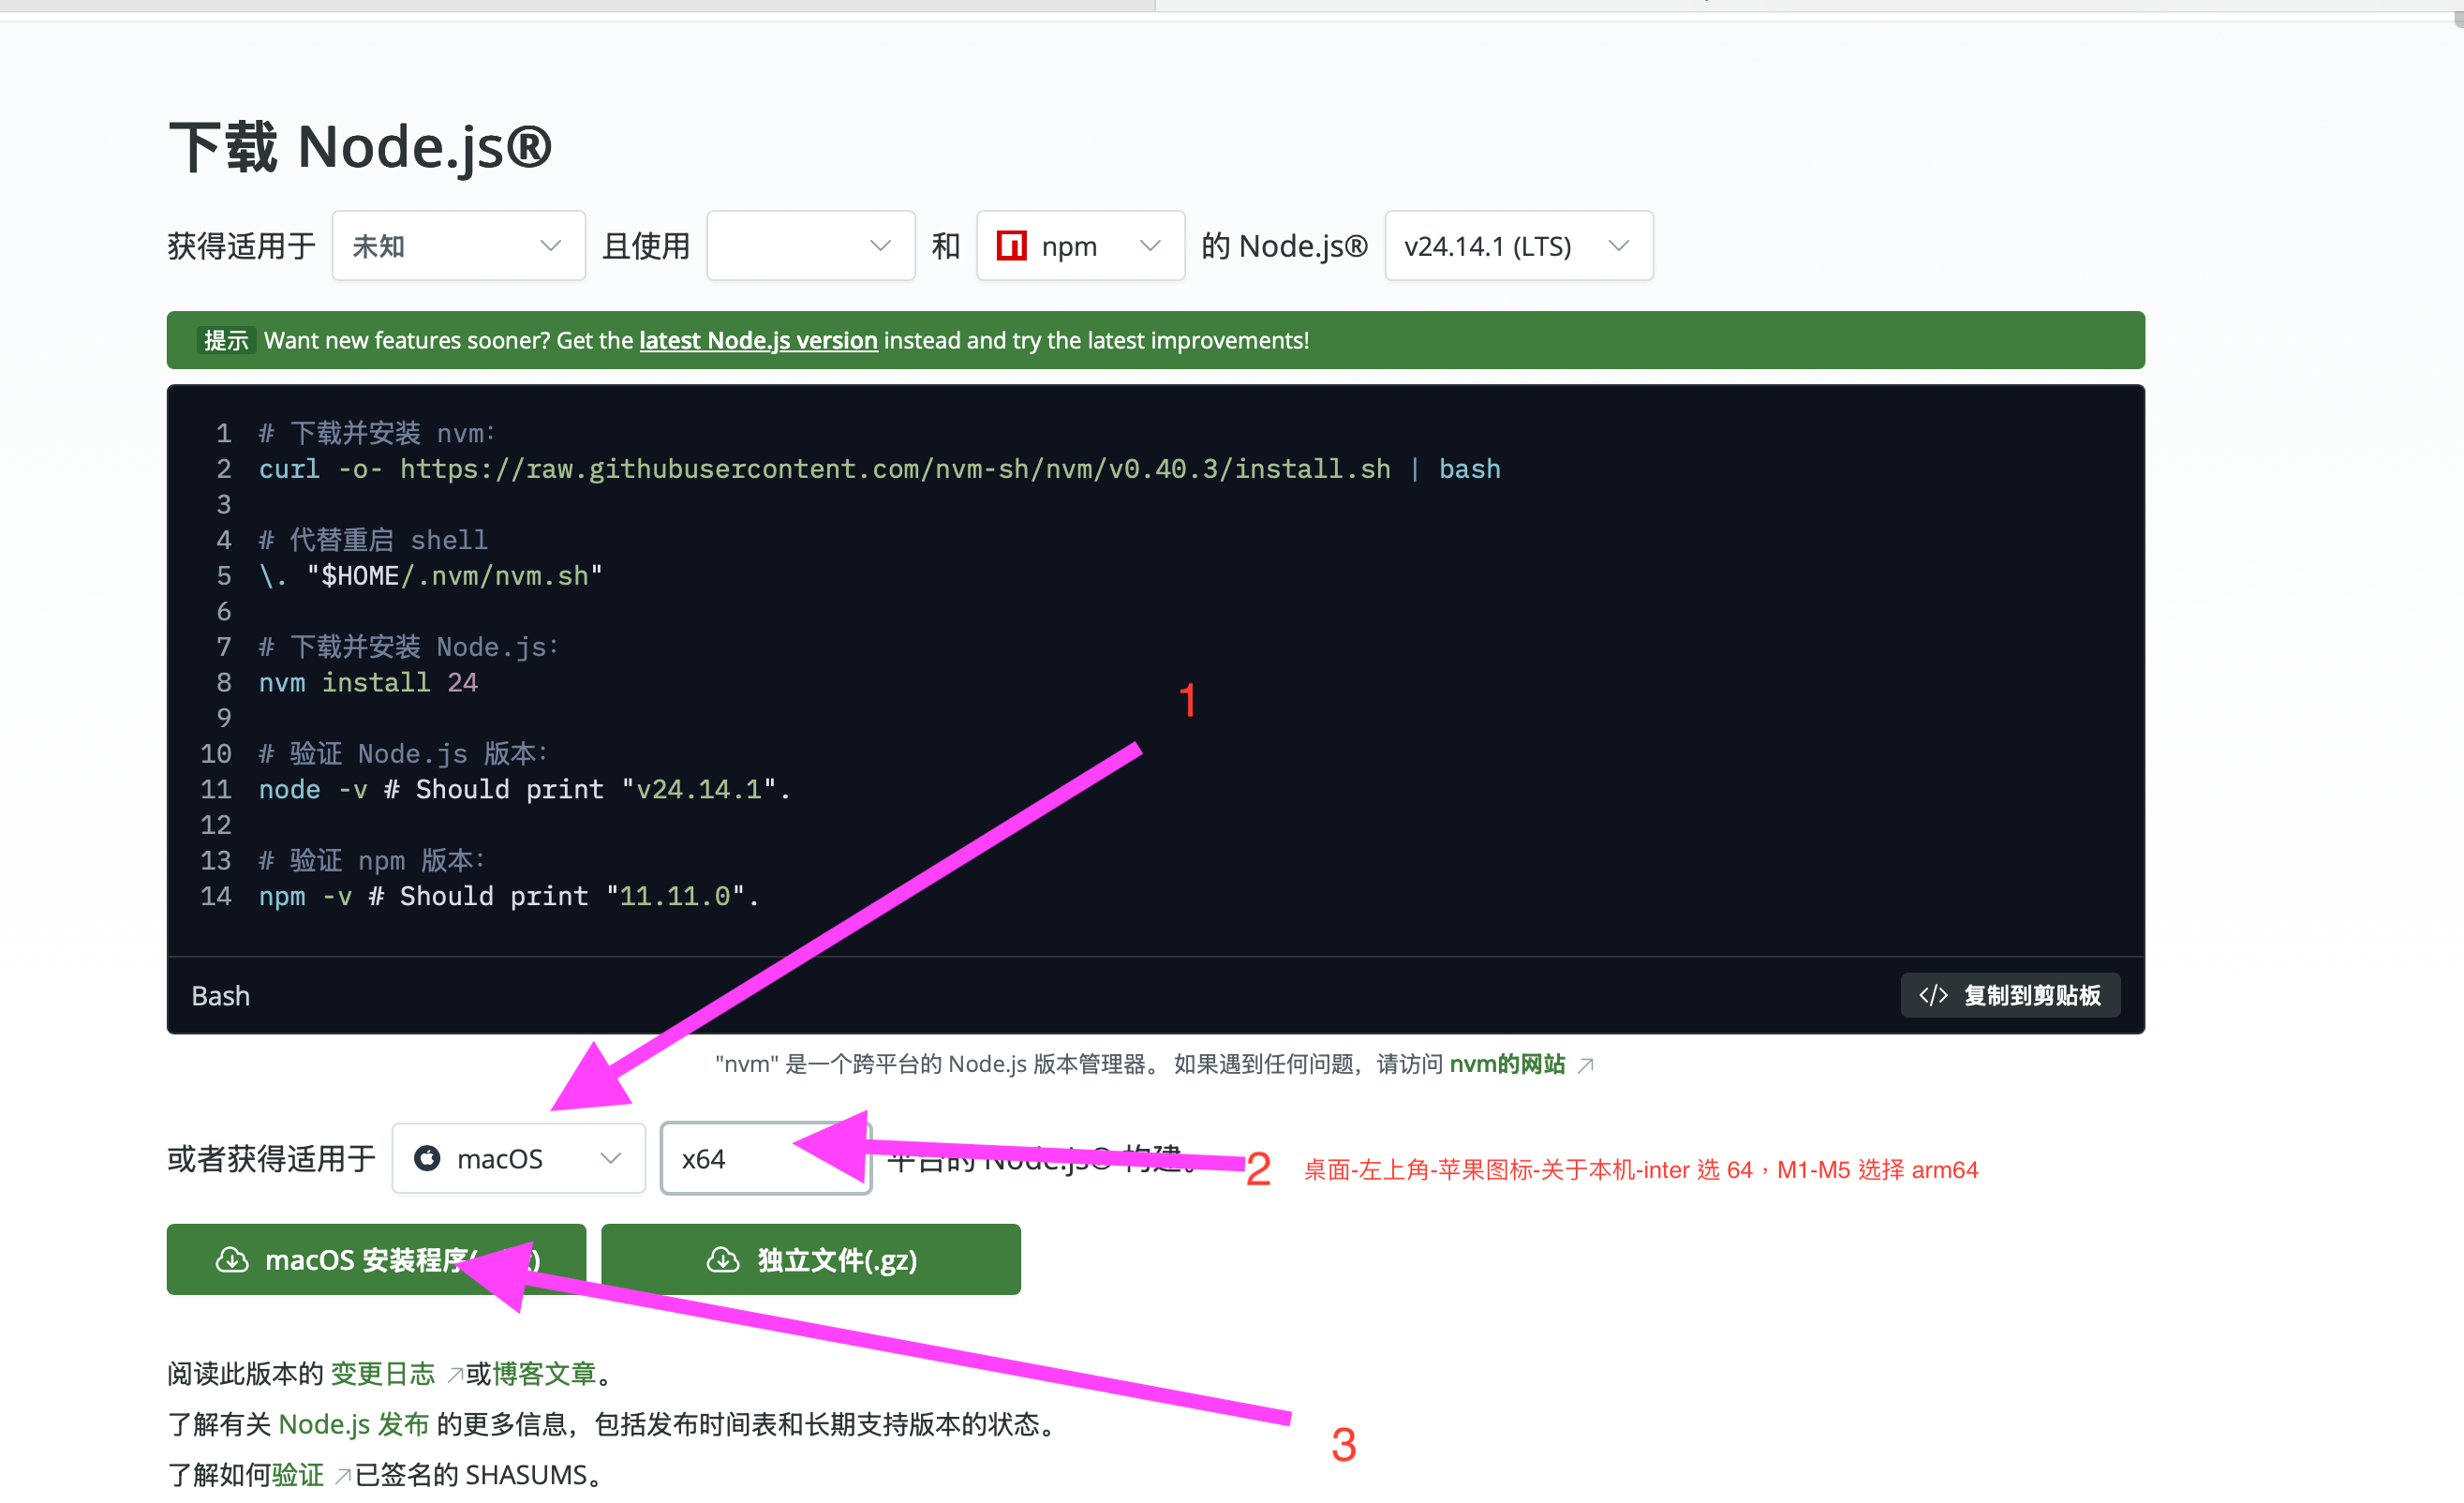
Mac installation:
Open the Node.js official download page, switch the platform to macOS, and follow steps 1-2-3 marked in the screenshot:
Step 7: Open CC Switch
Mac:
Open Launchpad (pinch with four fingers on the trackpad, or click the Launchpad icon in the Dock) -> find CC Switch and double-click to open it.
If cannot verify developer appears: Apple icon -> System Settings -> Privacy & Security -> scroll down -> click Open Anyway. If that still does not work, right-click the icon -> choose Open -> click Open again.
Windows:
Double-click to open it. If Windows protected your PC appears -> click More info -> Run anyway -> click Yes in the permission confirmation dialog.
Step 8: Configure CC Switch
After opening, if no provider has been configured yet, the interface should be an empty list or show the official provider. Both are normal initial states:
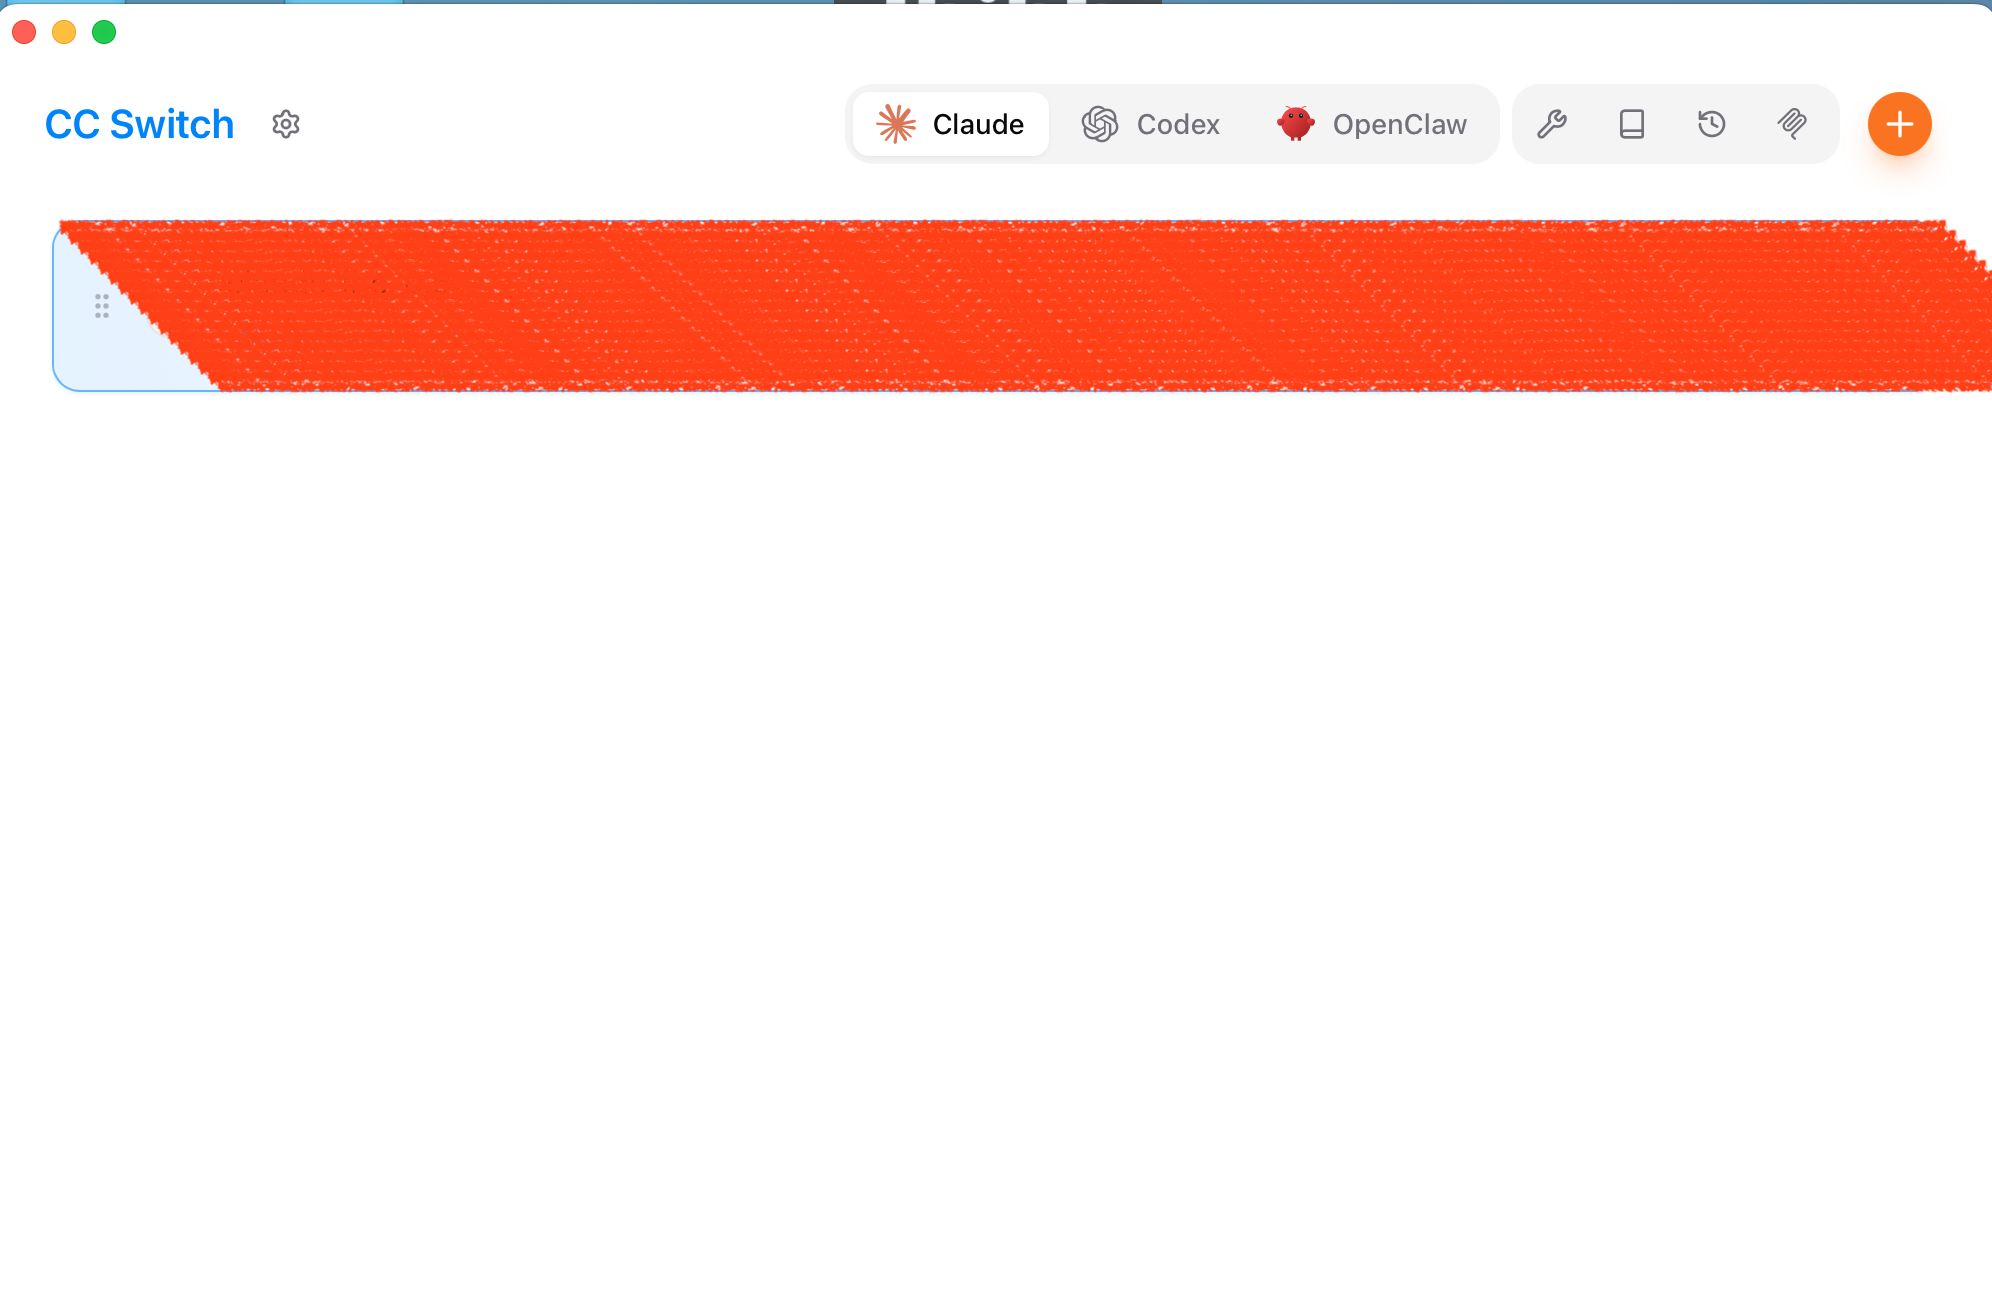
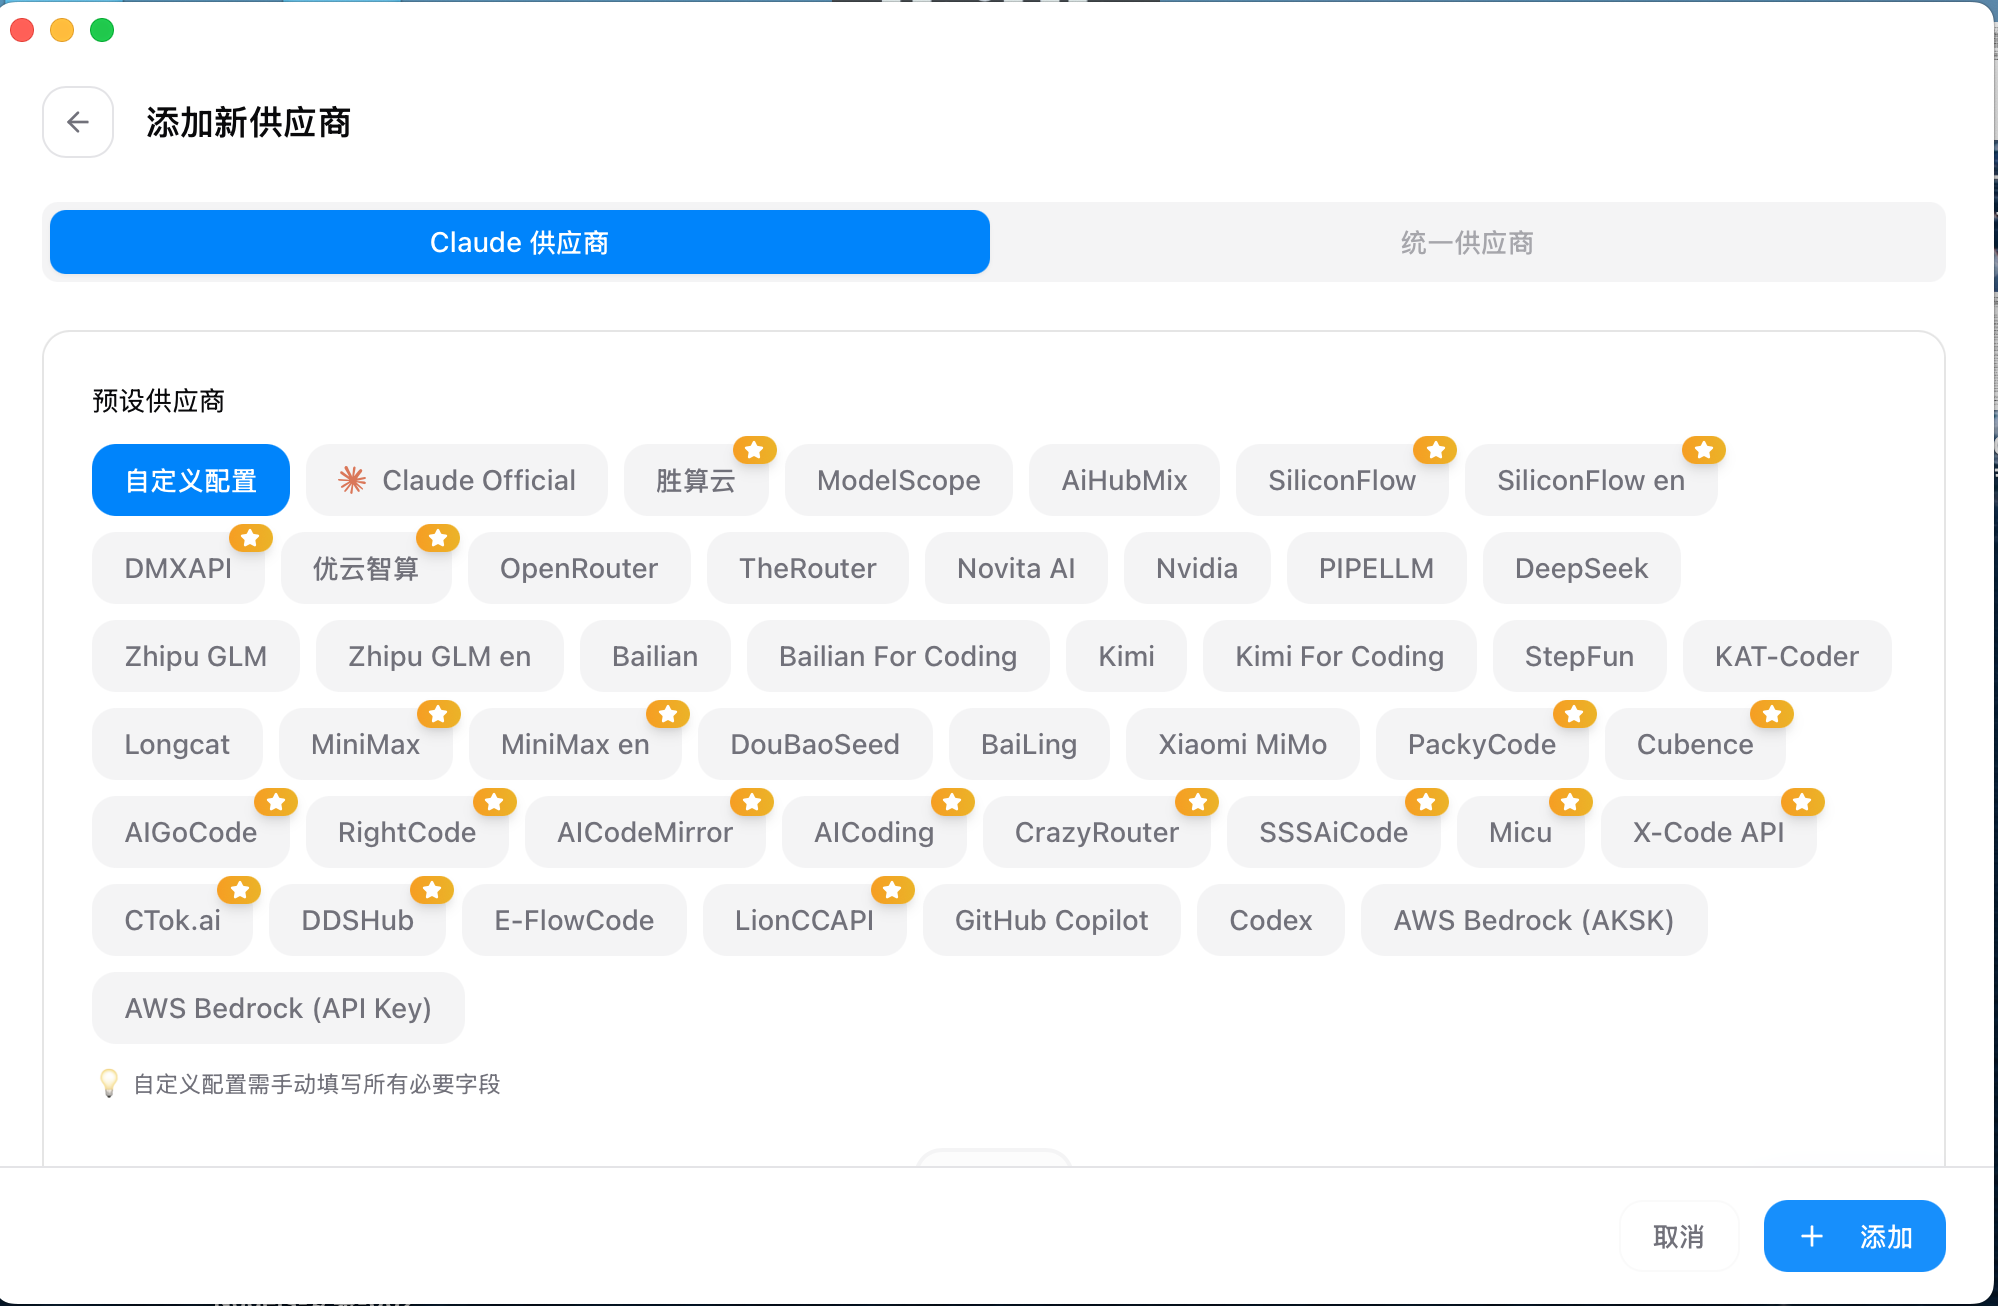
Click the + button in the top-right corner -> on the Add new provider page, choose Custom configuration:
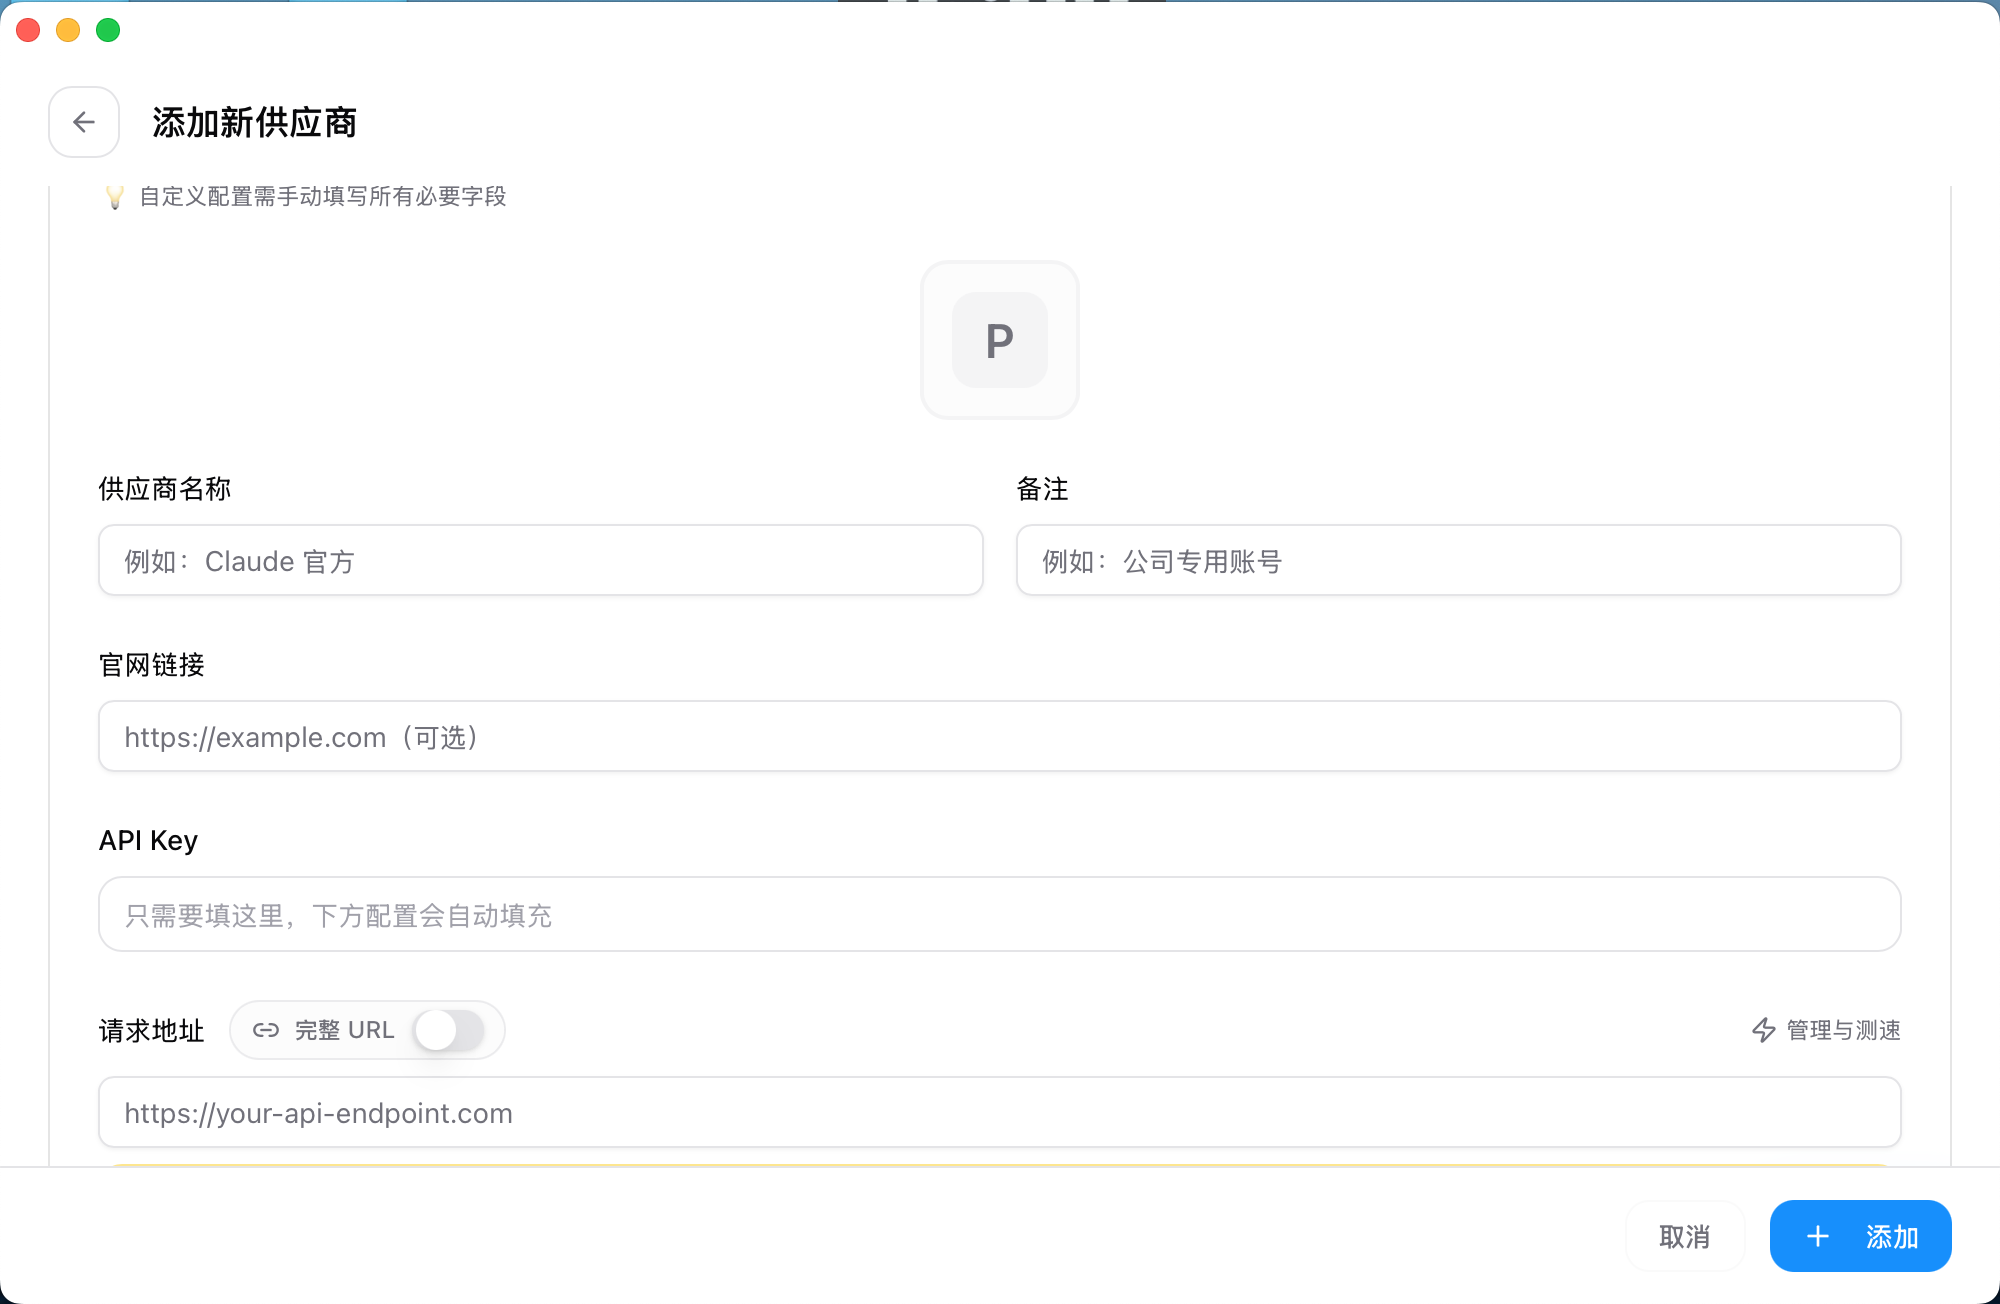
Fill in the form (scroll down to see all fields):
- Provider name:
yycode - Note: optional
- API Key: see below
- Request address:
https://yycode.net(do not check Full URL)
Get API Key: Open https://yycode.net -> left sidebar Token Management -> click the copy button indicated by the red arrow:
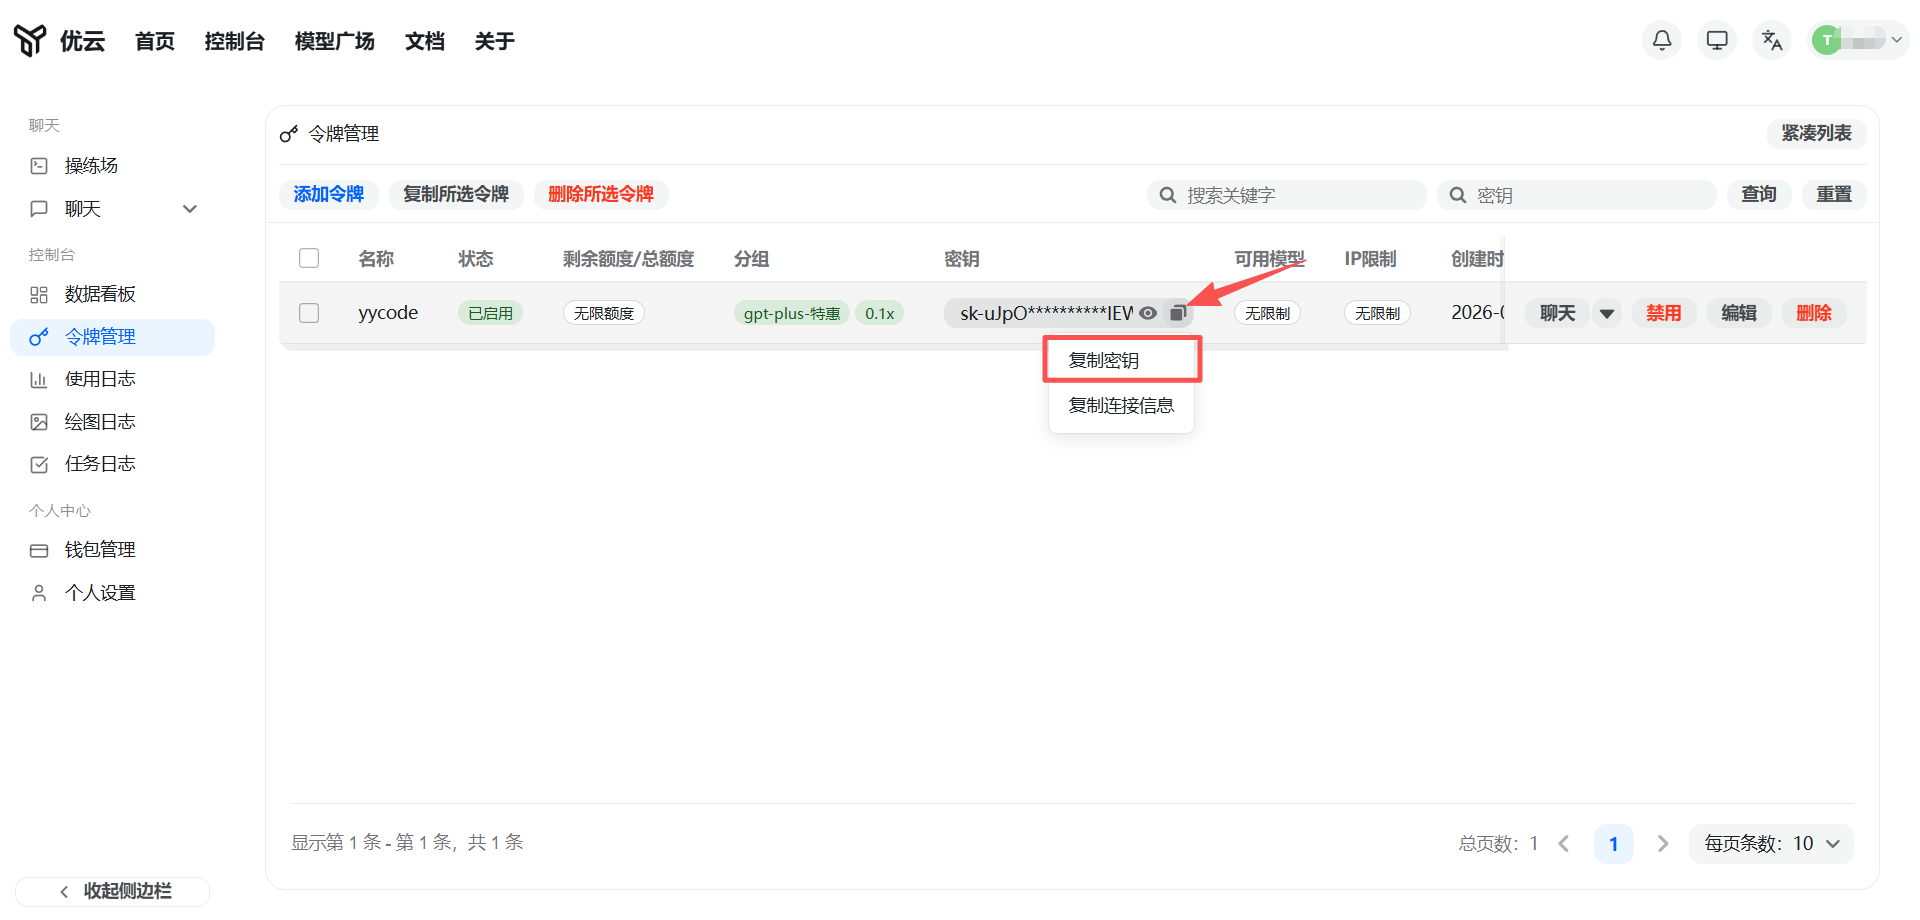
Paste the copied key into the API Key field in the form -> click + Add in the bottom-right corner.
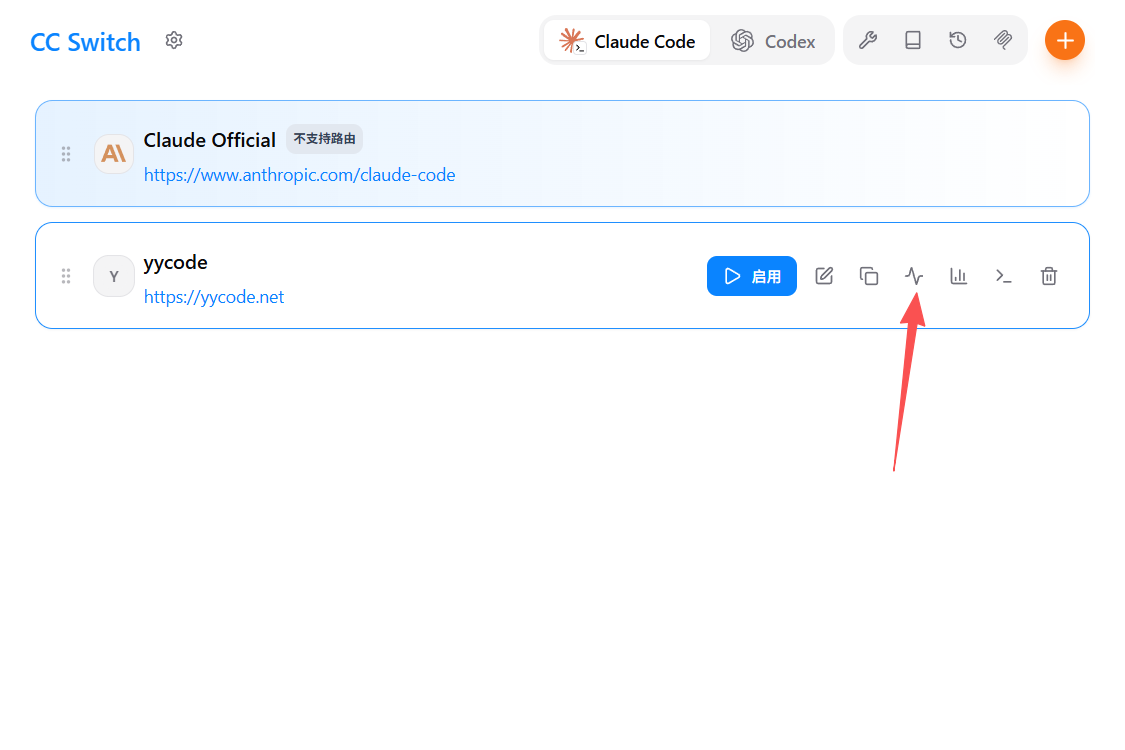
After adding, the provider appears in the list. First click the blue Enable button, then click the test entry indicated by the arrow on the right. Only when green text appears at the top does the configuration count as successful. If an error appears, send the CC Switch user manual link and the error screenshot to Doubao for troubleshooting:
Step 9: Install Codex CLI
Mac:
sudo npm install -g @openai/codex@latest
Verify:
codex --version
If a version number is printed, installation succeeded. Enter codex in the terminal and press Enter to start using it.
Windows:
npm install -g @openai/codex@latest
Verify:
codex --version
If there is an error, follow the method in Section VIII and use Doubao to troubleshoot. If there is no error, enter codex and press Enter to start using it.
Step 10: Install Claude Code
Claude Code is Anthropic's terminal AI assistant. Its installation method is similar to Codex.
Mac:
sudo npm install -g @anthropic-ai/claude-code@latest
Verify:
claude --version
If a version number is printed, installation succeeded. Enter claude in the terminal and press Enter to start using it.
Windows:
npm install -g @anthropic-ai/claude-code@latest
Verify:
claude --version
If a version number is printed, installation succeeded. Enter claude in the terminal and press Enter to start using it.
Note: To use Claude Code, you need to select the corresponding Claude group when creating the key in Step 4. After CC Switch enables the provider, it automatically manages Claude Code's API configuration.
If there is an error, follow the method in Section VIII and use Doubao to troubleshoot. Set the goal to "install Claude Code and confirm it works normally".
XI. Beginner Usage Manual
After the previous installation and configuration are complete, you only need to remember one sentence:
CC Switch switches interfaces; claude and codex in the terminal are the real entry points for doing work.
If this is your first time using a terminal, do not try to understand everything at once. Follow the steps first. Getting it running is the most important thing.
11.1 Preparation before first use
Before each use, first confirm these 4 things:
- Open
CC Switch - Switch at the top to the tool you want to use (
ClaudeorCodex) - Confirm that the corresponding provider is enabled, and that green success text appears at the top after testing
- Open a terminal and enter the corresponding command to start using it
Recommendation: If
Codexworks normally, start withCodexfirst. It is usually faster and more direct for troubleshooting, and its overall availability is also more stable.
11.2 Which to use first: Claude or Codex
A simple rule of thumb:
| Scenario | Recommended tool |
|---|---|
| Want to chat, organize thoughts, ask "what should I do now" | Claude |
| Want to execute tasks, troubleshoot, and directly solve problems | Codex |
If you cannot tell, remember two phrases: use Claude for chat and thinking; use Codex for execution and troubleshooting.
If only Codex is currently available, just use Codex. Doubao is more of a backup for temporary rescue when tools are not configured correctly.
11.3 How to start Claude Code
- Click
Claudeat the top ofCC Switch, and confirm the provider is enabled and the test succeeded - Open the terminal and enter:
claude
- The first time you use it, an initialization guide appears. Usually you can press Enter throughout and use the default options
After entering Claude Code, if you do not know what to say, try these first:
What model are you using right now?
I am a beginner. What information would you like me to provide so you can better help me complete my goal?
I want to complete [your goal]. What information would you like me to provide so you can better guide me step by step?
11.4 How to start Codex
- Click
Codexat the top ofCC Switch, and confirm the provider is enabled and the test succeeded - Open the terminal and enter:
codex
- The first time you use it, an initialization guide appears. Usually you can press Enter throughout and use the default options
After entering Codex CLI, try these basic questions first:
What model are you using right now?
Help me see what is in the current folder
I want to complete [your goal]. What information should I provide first?
If you can enter the interactive interface normally and there is no error, it means you can use it.
11.5 Most common operations
1. Switch models
In Claude Code or Codex, enter:
/model
Use the keyboard arrow keys to select a model, then press Enter to confirm.
Not sure what each model is for? Ask the AI directly:
What are these models suitable for? Which one is more suitable for my current task?
2. Switch nodes
If usage remains slow, errors keep appearing, or it suddenly becomes unavailable, you should go to the official website to switch nodes (routes).
Important distinction:
/modelinside the tool switches the model type; switching in the official website changes the node route. They are not the same thing.
- Want to change model capability -> use
/model- Want to solve slowness or instability -> switch nodes on the official website
Specific steps:
- Enter the official website -> left sidebar Token Management -> click edit -> choose a new group.
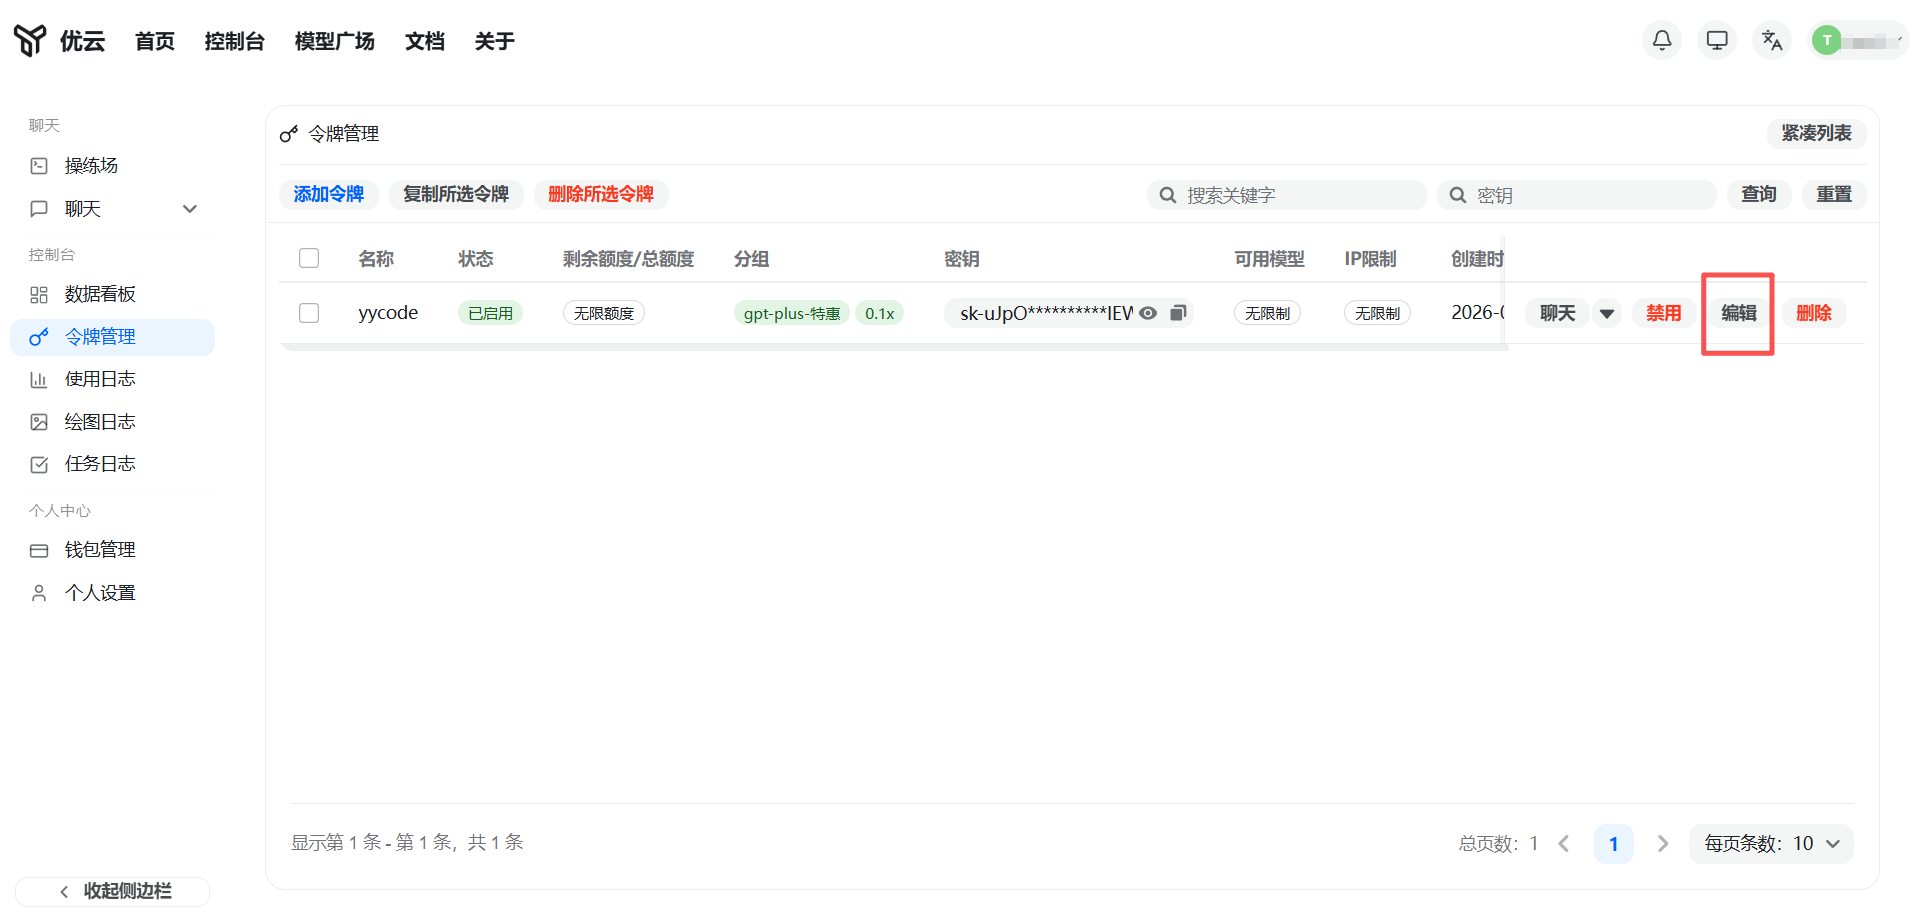
- Select an available node in the popup list.

After switching, confirm it takes effect in this order:
Refresh the official website page
Return to
CC SwitchTest again and confirm the provider is back to normal
Click the blue Enable button
Return to the terminal and verify whether it works
If instability persists, check in the member group whether it is a general outage.
3. The conversation is messy. How do I organize it?
If the model starts rambling, try in this order:
- Enter
/compact— compress the current conversation. Suitable when the content is a bit messy but you still want to continue - Enter
/clear— clear the current conversation. Suitable when the topic has gone off track and you want to start over
If you want to start a completely new conversation:
- Mac:
Command + N - Windows:
Ctrl + N
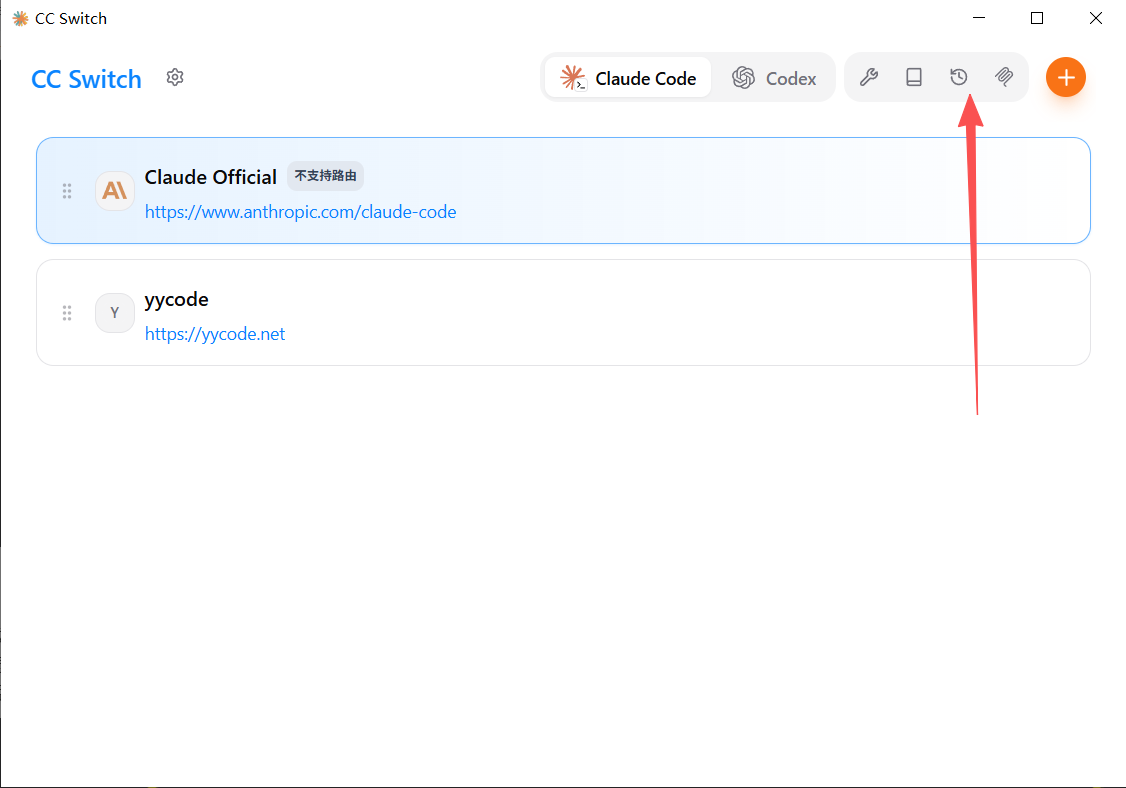
4. View session history
Previous conversations can be recovered in CC Switch's session management.
Click the session management entry in the top-right corner of CC Switch (the arrow indicates the position):
After entering:
- You can filter by tool type, such as only viewing
CodexorClaude Code - Click a historical session on the left to view past conversations
- If you need to continue a previous conversation, click Copy, then paste the command into the terminal to start

5. What if I made a wrong operation?
Do not rush to close the window:
- First try
Esc - If that does not work, try
Ctrl + C
6. It looks stuck. Is it frozen?
When running larger tasks, the interface may look like it is "stuck". Do not rush to conclude it has frozen.
Press Ctrl + O to view background output. Wait about 10 seconds and observe whether content is refreshing. After confirming, press Ctrl + O again to switch back to the original conversation state.
11.6 How to send files and images to AI
If you want AI to view a file or image, you do not need to type the full path. The simplest method:
- Find the target file in the file manager
- Copy the file
- Return to the terminal chat box and paste it
Tip: If you find that the cursor can only stay at the end while typing and you want to edit earlier content, the easiest beginner-friendly approach is to delete the wrong part and retype it, or simply restate your request.
11.7 How to ask better questions
Many beginners' problem is not that they cannot use the tool, but that they do not know how to start asking.
We recommend remembering this sentence:
I want to complete [your goal]. What information would you like me to provide so you can help me complete it better?
The benefit of this sentence is that you do not need to think through all details first. Just state the goal and let AI ask you for the needed information.
You can also say directly:
I am a beginner. Please guide me step by step and do not say too much at once.
11.8 What to do when red text appears
If you see a large block of red text during use, it usually means an error. Do not panic, and do not close the window as your first reaction.
Handle it in this priority order:
- Screenshot or copy the complete error text
- Send it to whichever current tool is available (
CodexorClaude) and continue asking - If neither is convenient, send it to Doubao
When
Codexis available, askCodexfirst. It is usually more direct for troubleshooting.
11.9 Beginners only need to remember these 8 sentences first
claudestarts Claude Code, andcodexstarts Codex- The first startup guide can usually be completed by pressing Enter all the way
- Prefer
Codex - Use
Claudefor chatting and thinking - Use
Codexfor execution and troubleshooting - Enter
/modelto switch model types; switch official website nodes on the website - If the conversation is messy, try
/compactfirst, then/clear - If you make a wrong operation, do not close the window first; try
EscorCtrl + C
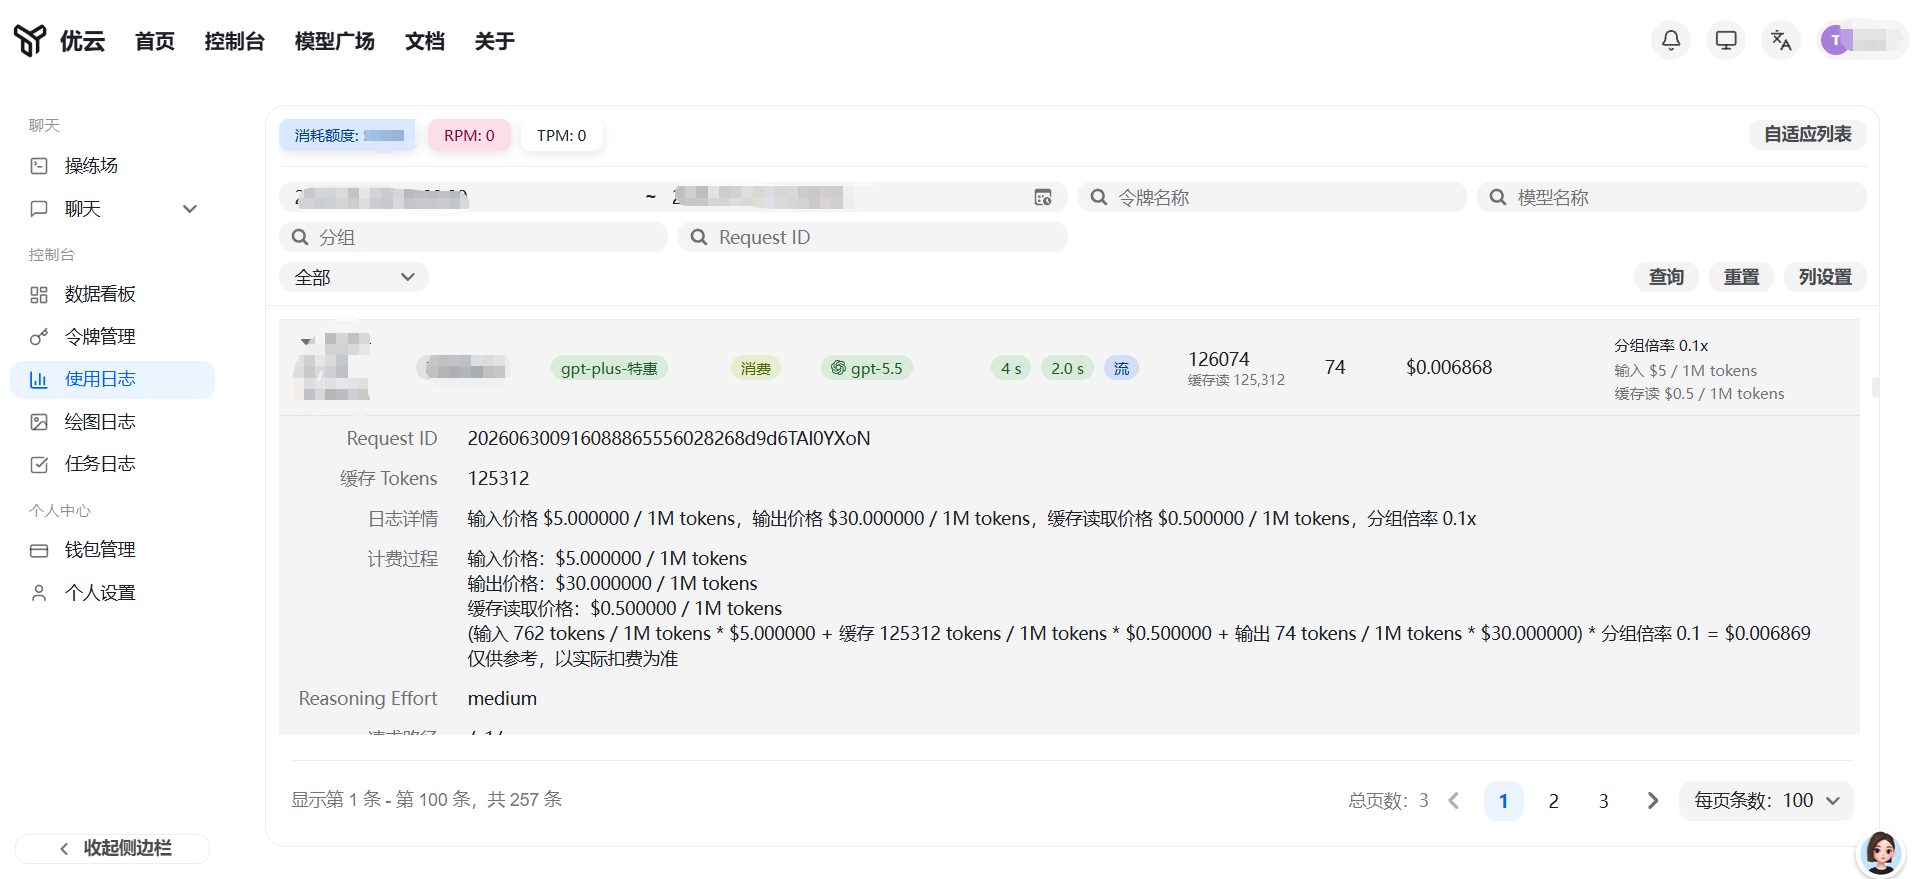
11.10 How to understand Token details
The first time you see Token, input Token, output Token, cache hit, and similar terms, you may feel confused. It is actually not complicated.
A Token is a "small text unit" used for AI billing. What you send to the AI and what it returns are both converted into Tokens.
| Term | Meaning |
|---|---|
| Input Token | Content you send to the AI |
| Output Token | Content the AI returns to you |
| Cache hit (cache creation) | The system reused previously processed content, which saves Tokens |
| Total Token | Total Tokens consumed by this request |
Taxi analogy:
| Taxi | Token |
|---|---|
| How many requirements you tell the driver before getting in | Input Token |
| How much feedback and route information the driver gives you | Output Token |
| This route was taken before, so the system does not need to calculate it again | Cache hit |
| Total distance of the whole ride | Total Token |
Fees are calculated based on these "distances". Simply put:
- The longer your input, the higher the input Tokens
- The longer the AI's reply, the higher the output Tokens
- The more cache hits, the more Tokens and money saved
- Continuous long multi-turn conversations cause total Tokens to keep accumulating
One-sentence summary: the more you use it, the longer you say, and the longer it replies, the higher the Tokens and the higher the cost.
Asking a few short daily questions does not need much concern. But if you keep asking the AI to output long-form content, revise repeatedly across many turns, or feed in large amounts of content, the cost will become noticeable.
Have questions? Send the error screenshot to Doubao and follow the method in Section VIII to troubleshoot step by step. You can also refer to the CC Switch user manual:
https://github.com/farion1231/cc-switch/blob/main/docs/user-manual/zh/README.md
This document is current as of April 12, 2026 and may be updated at any time. If you have questions, please add customer support